Lexus NX: Removal
REMOVAL
CAUTION / NOTICE / HINT
CAUTION:
Wear protective gloves. Sharp areas on the parts may injure your hands.
PROCEDURE
1. REMOVE TONNEAU COVER ASSEMBLY
Click here .gif)
2. REMOVE DECK BOARD ASSEMBLY
Click here
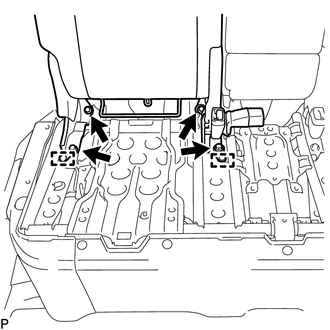
3. REMOVE BENCH TYPE REAR SEAT CUSHION ASSEMBLY
| (a) Lift the front end of the rear seat cushion assembly as shown in the illustration and detach the 2 hooks from the rear seat cushion lock hook section. NOTICE: The rear seat cushion frame will deform if lifted at a position far from the rear seat cushion lock hook. |
|
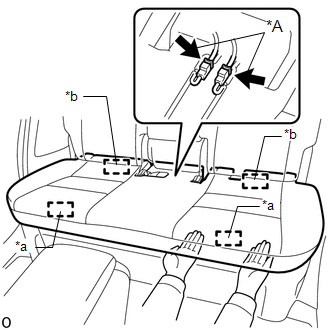
(b) Detach the 2 hooks of the rear of the rear seat cushion frame.
(c) Pass the rear seat inner with center belt assembly RH through the rubber band of the rear seat cushion assembly.
(d) w/ Seat Heater System:
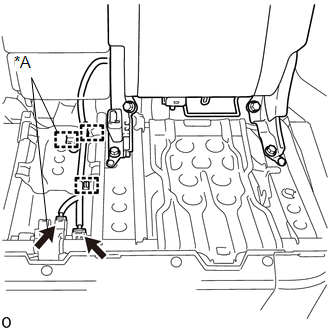
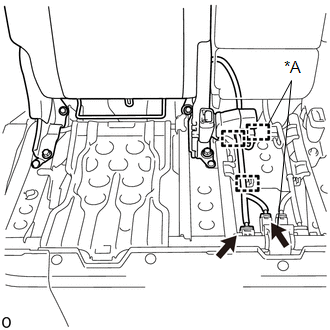
(1) Slightly lift up the bench type rear seat cushion assembly and disconnect the 2 connectors under it.
NOTICE:
Be careful not to damage the connector or wire harness.
(e) Remove the bench type rear seat cushion assembly.
NOTICE:
Be careful not to damage the vehicle body.
4. REMOVE REAR DOOR SCUFF PLATE LH
Click here
5. REMOVE REAR DOOR SCUFF PLATE RH
HINT:
Use the same procedure described for the LH side.
6. REMOVE NO. 3 BATTERY SERVICE COVER BOARD
| (a) Remove the 2 clips. |
|
(b) Detach the 2 clips and guide to remove the No. 3 battery service cover board.
| (c) Detach the clamp to disconnect the wire harness. |
|
(d) Disconnect the connector.
7. REMOVE NO. 2 BATTERY SERVICE COVER BOARD
HINT:
Use the same procedure described for the No. 3 battery service cover board.
8. REMOVE REAR POWER SEAT SWITCH
Click here
9. REMOVE REAR SEATBACK ASSEMBLY LH
(a) Operate the rear power seat switch to fold down the rear seatback assembly LH.
| (b) Using a clip remover, remove the 4 clips. |
|
(c) Operate the rear power seat switch to move the rear seatback assembly LH to the upright position.
| (d) w/o Seat Heater System: (1) Disconnect the connector and detach the 2 clamps. |
|
(e) w/ Seat Heater System:
(1) Disconnect the 2 connectors and detach the 3 clamps.
| (f) Remove the 4 bolts. |
|
(g) Detach the 2 guides to remove the rear seatback assembly LH.
NOTICE:
Be careful not to damage the vehicle body.
10. REMOVE REAR SEATBACK ASSEMBLY RH
(a) Operate the rear power seat switch to fold down the rear seatback assembly RH.
| (b) Using a clip remover, remove the 3 clips. |
|
(c) Operate the rear power seat switch to move the rear seatback assembly RH to the upright position.
| (d) w/o Seat Heater System: (1) Disconnect the connector and detach the 2 clamps. |
|
(e) w/ Seat Heater System:
(1) Disconnect the 2 connectors and detach the 3 clamps.
| (f) Remove the 4 bolts. |
|
(g) Detach the 2 guides to remove the rear seatback assembly RH.
NOTICE:
Be careful not to damage the vehicle body.
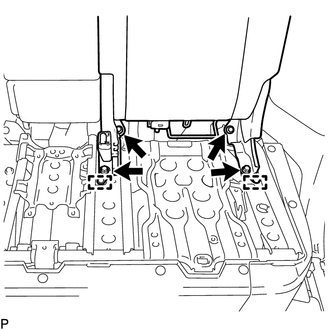
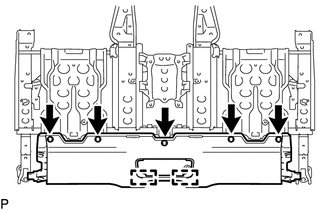
11. REMOVE BATTERY SERVICE HOLE COVER
| (a) Detach the 2 claws and 2 guides to remove the battery service hole cover. |
|
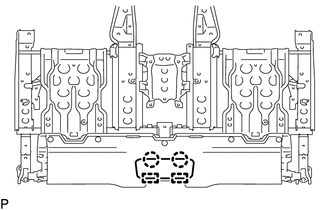
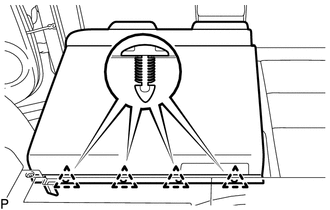
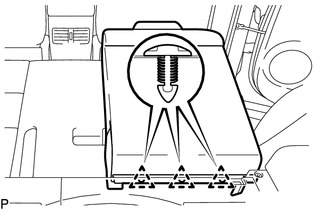
12. REMOVE BATTERY SERVICE COVER BOARD
| (a) Remove the 5 clips. |
|
(b) Detach the 2 guides to remove the battery service cover board.
13. REMOVE NO. 3 DECK BOARD SUB-ASSEMBLY
Click here
14. REMOVE NO. 2 DECK BOARD SUB-ASSEMBLY
Click here
15. REMOVE REAR DECK FLOOR BOX
Click here
16. REMOVE SPARE TIRE
Click here
17. REMOVE DECK FLOOR BOX LH
Click here
18. REMOVE DECK FLOOR BOX RH
Click here
19. REMOVE NO. 1 TOOL BOX SUB-ASSEMBLY
Click here
20. REMOVE NO. 2 TOOL BOX SUB-ASSEMBLY
Click here
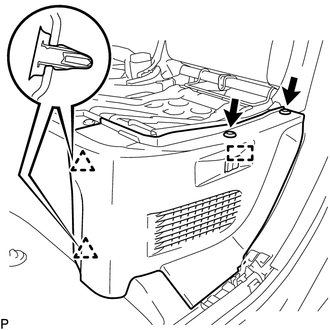
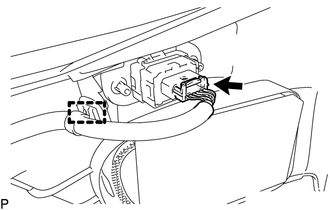
21. REMOVE NO. 1 SEAT LEG ASSEMBLY
| (a) w/o Seat Heater System: (1) Detach the 2 claws and 3 clamps to disconnect the wire harness. |
|
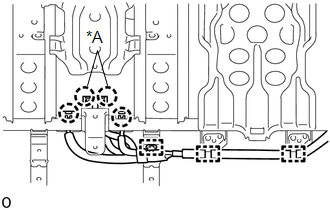
(b) w/ Seat Heater System:
(1) Detach the 4 claws and 3 clamps to disconnect the wire harness.
| (c) Remove the 8 bolts. |
|
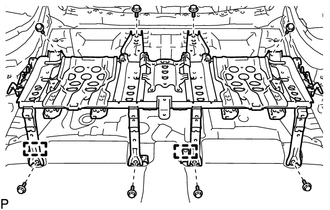
(d) Detach the 2 guides to remove the No. 1 seat leg assembly.
READ NEXT:
 Disassembly
DISASSEMBLY CAUTION / NOTICE / HINT CAUTION: Wear protective gloves. Sharp areas on the parts may injure your hands. PROCEDURE 1. REMOVE REAR SEAT CUSHION LOCK HOOK NOTICE:
Perform the following on
Inspection
INSPECTION PROCEDURE 1. PRECAUTION NOTICE: After performing the following check, initialize the fold seat control ECU (initial position reset and initial position memorization). Click here 2. INSPEC
Reassembly
REASSEMBLY CAUTION / NOTICE / HINT CAUTION: Wear protective gloves. Sharp areas on the parts may injure your hands. PROCEDURE 1. INSTALL REAR SEAT WIRE LH (for LH Side) (a) Attach the 2 clamps to i
SEE MORE:
Inspection
INSPECTION PROCEDURE 1. INSPECT REAR SPEAKER ASSEMBLY (a) Measure the resistance according to the value(s) in the table below. Standard Resistance: for 8 Speakers Tester Connection Condition Specified Condition 1 - 2 Always 4 Ω for 10 Speakers Tester Connection Condition
Installation
INSTALLATION PROCEDURE 1. INSTALL TIMING CHAIN COVER OIL SEAL (a) w/o Side Lip: (1) Apply MP grease to the lip of a new timing chain cover oil seal. NOTICE:
Do not allow foreign matter to contact the lip of the timing chain cover oil seal.
Do not allow MP grease to contact the dust seal.
