Lexus NX: Removal
REMOVAL
PROCEDURE
1. REMOVE FRONT SEAT ASSEMBLY LH
Click here .gif)
2. REMOVE FRONT SEAT ASSEMBLY RH
HINT:
Use the same procedure as for the driver seat.
3. REMOVE FRONT SEAT INNER BELT ASSEMBLY LH
(a) Disconnect the 2 connectors.
| (b) Detach the 6 clamps. |
|
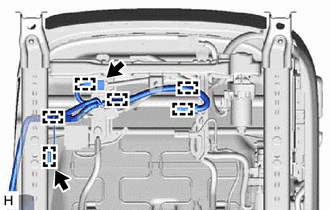
| (c) Detach the clamp. |
|
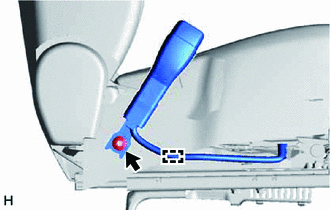
(d) Remove the nut and front seat inner belt assembly LH.
(e) Remove the front seat belt anchor plate.
4. REMOVE FRONT SEAT INNER BELT ASSEMBLY RH
(a) Disconnect the connector.
| (b) Detach the 3 clamps. |
|
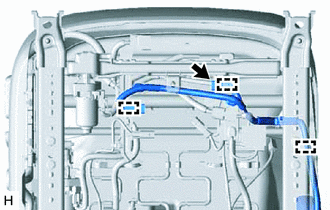
| (c) Detach the clamp. |
|
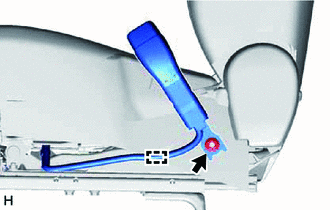
(d) Remove the nut and front seat inner belt assembly RH.
(e) Remove the front seat belt anchor plate.
READ NEXT:
 Inspection
INSPECTION PROCEDURE 1. INSPECT FRONT SEAT INNER BELT ASSEMBLY LH (a) Measure the resistance according to the value(s) in the table below. *1 Connector A *2 Connector B *3 Connector C
Installation
INSTALLATION PROCEDURE 1. INSTALL FRONT SEAT INNER BELT ASSEMBLY LH (a) Install the front seat belt anchor plate. (b) Install the front seat inner belt assembly LH with the nut. Torque: 42 N·m {4
SEE MORE:
Hybrid Powertrain Control Module (P0A1D-144)
DESCRIPTION The hybrid vehicle control ECU monitors its internal operation, it will store a DTC and perform fail-safe control if it detects the following malfunction. If the following DTC is output, replace the hybrid vehicle control ECU. DTC No. Detection Item DTC Detection Condition Troub
Removal
REMOVAL CAUTION / NOTICE / HINT HINT:
Use the same procedure for the RH and LH sides.
The procedure listed below is for the LH side.
PROCEDURE 1. PRECAUTION NOTICE: After turning the power switch off, waiting time may be required before disconnecting the cable from the negative (-) auxiliary
© 2016-2026 Copyright www.lexunx.com
