Lexus NX: Removal
REMOVAL
PROCEDURE
1. REMOVE FRONT FLOOR COVER CENTER LH
Click here .gif)
2. REMOVE CHARCOAL CANISTER ASSEMBLY
| (a) Disconnect the connector from the canister pump module. |
|
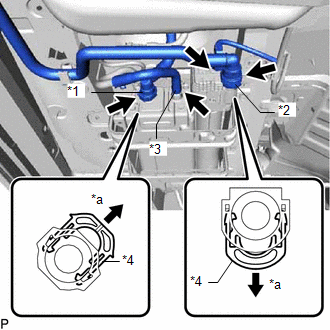
(b) Slide the clamp and disconnect the purge line hose from the charcoal canister assembly.
(c) Disconnect the air inlet line hose from the air inlet line port.
(1) Pinch the retainer and then pull out it.
NOTICE:
- Do not use any tools in this procedure.
- Check for any dirt and foreign matter contamination in the charcoal canister assembly and around the air inlet line hose. Clean if necessary. Foreign matter may damage the O-ring or cause leaks in the seal between the charcoal canister assembly and air inlet line hose.
- When disconnecting the air inlet line hose, make sure that the retainer is not lifted.
(d) Disconnect the vent line hose from the charcoal canister assembly.
(1) Pinch the retainer and then pull out it.
NOTICE:
- Do not use any tools in this procedure.
- Check for any dirt and foreign matter contamination in the charcoal canister assembly and around the vent line hose. Clean if necessary. Foreign matter may damage the O-ring or cause leaks in the seal between the charcoal canister assembly and vent line hose.
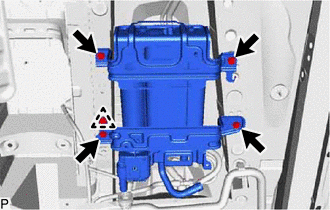
| (e) Remove the 4 bolts, clip and charcoal canister assembly. |
|
3. REMOVE CANISTER PUMP MODULE
(a) Before removing the canister pump module, clean the charcoal canister assembly by blowing air into it to ensure that the charcoal canister assembly is free of foreign matter.
NOTICE:
- Make sure to clean the charcoal canister assembly using only air.
- Do not use gasoline, thinners or solvents.
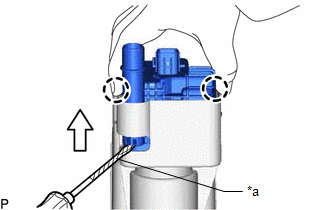
| (b) While disengaging the 2 claws as shown in the illustration, push the canister pump module upwards using a screwdriver to remove it. HINT: Tape the screwdriver tip before use. |
|
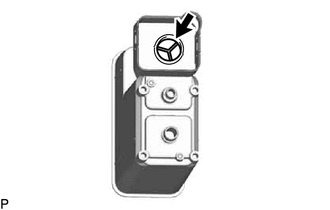
| (c) Check if the charcoal canister assembly contains foreign matter such as mud or water. (1) Visually check that the inside of the charcoal canister assembly is free of foreign matter. (2) Hold the charcoal canister assembly upside down to make sure that the charcoal canister assembly is free of foreign matter. If the charcoal canister assembly contains foreign matter, replace the charcoal canister assembly. |
|
READ NEXT:
 Inspection
INSPECTION PROCEDURE 1. INSPECT CHARCOAL CANISTER ASSEMBLY (a) Visually check the charcoal canister assembly for cracks or damage. If cracks or damage is found, replace the charcoal canister assemb
Installation
INSTALLATION PROCEDURE 1. INSTALL CANISTER PUMP MODULE (a) Engage the 2 claws to install a new canister pump module to the charcoal canister assembly. NOTICE:
Do not allow foreign matter such
Egr Cooler
ComponentsCOMPONENTS ILLUSTRATION *1 EGR COOLER ASSEMBLY *2 NO. 5 WATER BY-PASS HOSE *3 STUD BOLT *4 GASKET *5 NO. 1 WATER BY-PASS PIPE *6 NO. 1 EGR PIPE N*m (kgf
SEE MORE:
Cooling System
DESCRIPTION The cause of the malfunction may be the cooling system. Check whether the grille is blocked, whether coolant is leaking, the HV radiator fan operating condition and whether coolant has frozen. Related Parts Check Area Inspection Step Grille blockage, coolant amount, coolant ho
Installation
INSTALLATION CAUTION / NOTICE / HINT HINT:
Use the same procedure for the RH and LH sides.
The procedure described below is for the LH side.
PROCEDURE 1. INSTALL HEADLIGHT ASSEMBLY LH (a) w/o Headlight ECU: Connect the 2 connectors and attach the wire harness clamp. *A w/o
