Lexus NX: Installation
INSTALLATION
PROCEDURE
1. INSTALL RAIN SENSOR TAPE
NOTICE:
The rain sensor tape is reusable. Only replace the tape if it is damaged or contaminated.
(a) Clean the rain sensor sensing portion with a piece of cloth, etc.
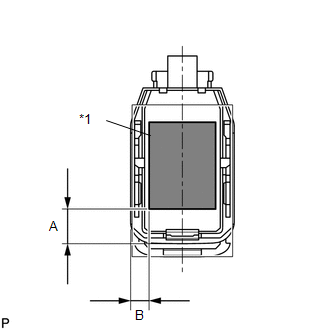
| (b) Peel off the smaller release sheet, and then attach the rain sensor tape on the rain sensor sensing portion as shown in the illustration. Standard:
NOTICE: Use your fingers to push out any air bubbles from under the tape. |
|
2. INSTALL RAIN SENSOR
(a) Clean the windshield glass with a piece of cloth, etc.
NOTICE:
- Make sure that there is no rain sensor tape residue remaining on the windshield glass. If there is, remove the residue.
- If there is any rain sensor tape residue remaining on the windshield glass, replace the tape.
(b) When installing a new rain sensor or replacing the rain sensor tape:
(1) Peel off the release sheet.
HINT:
Do not touch the silicon coated surfaces.
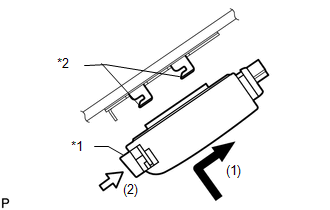
| (2) Attach the 2 guides, and then carefully install the rain sensor to the glass surface so that air bubbles do not form between the contact surfaces. NOTICE: Do not touch the silicon coated or glass surfaces. |
|
(3) Push in the stopper.
(4) Connect the connector.
3. INSTALL RAIN SENSOR COVER
(a) Attach the 2 claws to install the rain sensor cover.
READ NEXT:
 Components
COMPONENTS ILLUSTRATION *A w/ Woofer *B w/o Woofer *C w/o Power Back Door *D w/ Power Back Door *1 BACK DOOR CENTER GARNISH *2 BACK DOOR FINISH COVER LH *3 BACK DOO
On-vehicle Inspection
ON-VEHICLE INSPECTION PROCEDURE 1. INSPECT REAR WIPER MOTOR ASSEMBLY (a) Check the automatic stop (park) position. (1) Operate the rear wiper motor assembly, and then stop the operation. Check the
SEE MORE:
Inspection
INSPECTION PROCEDURE 1. INSPECT FRONT DOOR OUTSIDE HANDLE ASSEMBLY LH (a) Check that the LED illuminates. (1) Apply 6.0 V (4 dry cell batteries in series) to each terminal and check the illumination state of the light. OK: Measurement Condition Specified Condition Battery positive (+) â
Components
COMPONENTS ILLUSTRATION *1 AIR FUEL RATIO SENSOR *2 INVERTER RESERVE TANK ASSEMBLY *3 NO. 1 EXHAUST MANIFOLD HEAT INSULATOR *4 WIRE HARNESS *5 RADIATOR HOSE CLAMP - - N*m (kgf*cm, ft.*lbf): Specified torque * For use with SST
