Lexus NX: Components
COMPONENTS
ILLUSTRATION
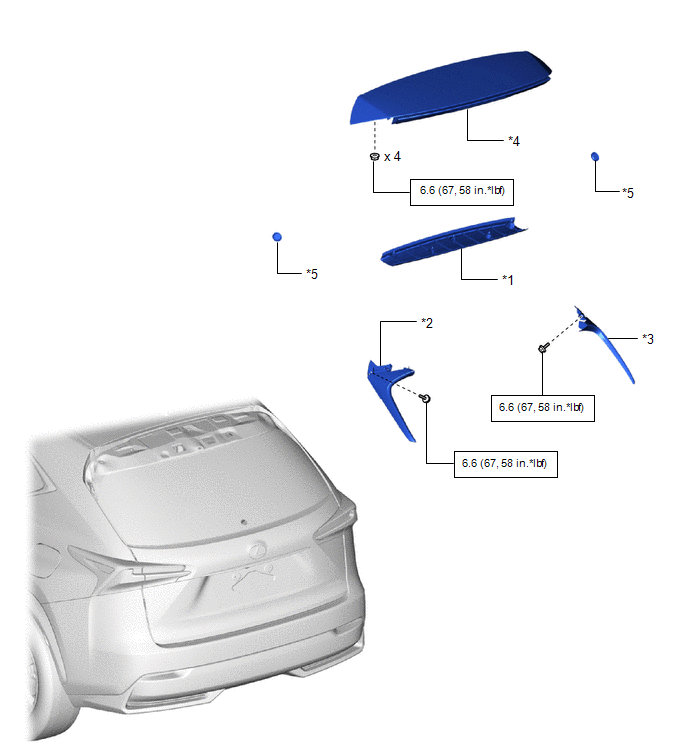
| *1 | BACK DOOR CENTER GARNISH | *2 | REAR SIDE SPOILER SUB-ASSEMBLY LH |
| *3 | REAR SIDE SPOILER SUB-ASSEMBLY RH | *4 | REAR SPOILER ASSEMBLY |
| *5 | HOLE PLUG | - | - |
.png) | N*m (kgf*cm, ft.*lbf): Specified torque | - | - |
ILLUSTRATION
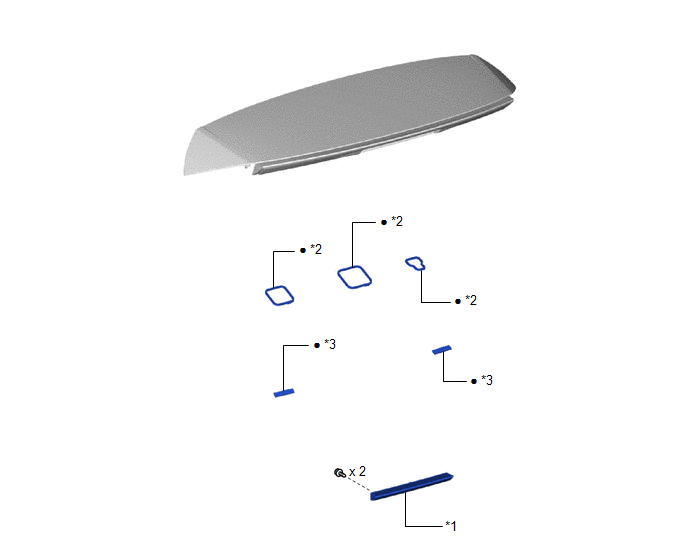
| *1 | CENTER STOP LIGHT ASSEMBLY | *2 | PACKING |
| *3 | REAR SPOILER NO. 2 PROTECTOR | - | - |
| ● | Non-reusable part | - | - |
READ NEXT:
 Removal
REMOVAL PROCEDURE 1. REMOVE BACK DOOR CENTER GARNISH Click here 2. REMOVE REAR SPOILER ASSEMBLY (a) Remove the 2 hole plugs. Nut Bolt Connector (b) Remove the 4 nuts. (c) Re
Disassembly
DISASSEMBLY PROCEDURE 1. REMOVE CENTER STOP LIGHT ASSEMBLY Click here 2. REMOVE REAR SPOILER NO. 2 PROTECTOR (a) Remove the 2 rear spoiler No. 2 protectors. 3. REMOVE PACKING (a) Remove the 3 packi
Reassembly
REASSEMBLY PROCEDURE 1. INSTALL PACKING (a) Install 3 new packings. 2. INSTALL REAR SPOILER NO. 2 PROTECTOR HINT: When installing the rear spoiler No. 2 protector, heat the rear spoiler assembly using
SEE MORE:
Removal
REMOVAL PROCEDURE 1. REMOVE REAR SEAT ASSEMBLY (for Manual Seat) Click here 2. REMOVE REAR SEAT ASSEMBLY (for Power Seat) Click here 3. REMOVE REAR SEAT INNER WITH CENTER BELT ASSEMBLY RH (a) for Manual Seat: (1) w/o Seat Heater System:
Using a clip remover, detach the 2 wire harness clamp
Trailer towing (vehicles with towing
package)
Your vehicle is designed primarily
as a passenger-and-load-carrying
vehicle. Towing a trailer can have an
adverse impact on handling, performance,
braking, durability, and
fuel consumption. For your safety
and the safety of others, you must
not overload your vehicle or trailer.
You must al
© 2016-2026 Copyright www.lexunx.com
