Lexus NX: Removal
REMOVAL
PROCEDURE
1. REMOVE BACK DOOR CENTER GARNISH
Click here .gif)
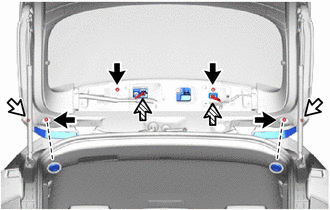
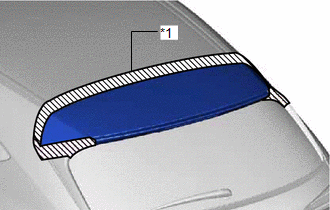
2. REMOVE REAR SPOILER ASSEMBLY
(a) Remove the 2 hole plugs.
.png) | Nut |
.png) | Bolt |
.png) | Connector |
(b) Remove the 4 nuts.
(c) Remove the 2 bolts.
(d) Disconnect the 2 connectors.
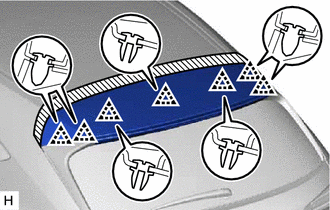
| (e) Put protective tape around the rear spoiler assembly. |
|
| (f) Using moulding remover D, detach the 7 clips and remove the rear spoiler assembly. |
|
3. REMOVE REAR SIDE SPOILER SUB-ASSEMBLY LH
| (a) Put protective tape around the rear side spoiler sub-assembly LH. |
|
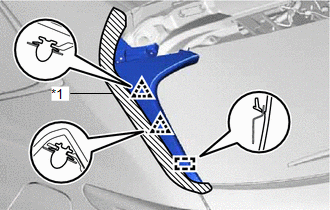
(b) Detach the 2 clips and guide and remove the rear spoiler sub-assembly LH.
4. REMOVE REAR SIDE SPOILER SUB-ASSEMBLY RH
HINT:
Use the same procedure described for the LH side.
READ NEXT:
 Disassembly
DISASSEMBLY PROCEDURE 1. REMOVE CENTER STOP LIGHT ASSEMBLY Click here 2. REMOVE REAR SPOILER NO. 2 PROTECTOR (a) Remove the 2 rear spoiler No. 2 protectors. 3. REMOVE PACKING (a) Remove the 3 packi
Reassembly
REASSEMBLY PROCEDURE 1. INSTALL PACKING (a) Install 3 new packings. 2. INSTALL REAR SPOILER NO. 2 PROTECTOR HINT: When installing the rear spoiler No. 2 protector, heat the rear spoiler assembly using
Installation
INSTALLATION PROCEDURE 1. INSTALL REAR SIDE SPOILER SUB-ASSEMBLY LH (a) Attach the 2 clips and guide to install the rear side spoiler sub-assembly LH. 2. INSTALL REAR SIDE SPOILER SUB-ASSEMBLY RH HINT
SEE MORE:
Certification ECU Vehicle Information Reading/Writing Process Malfunction (B15F7)
DESCRIPTION This DTC is stored when items controlled by the certification ECU cannot be customized via the audio and visual system vehicle customization screen. HINT: The certification ECU controls the smart access system with push-button start (for Entry Function) related items that are customizabl
Illumination Circuit
DESCRIPTION Power is supplied to the radio receiver assembly and steering pad switch assembly when the light control switch is in the tail or head position. WIRING DIAGRAM CAUTION / NOTICE / HINT NOTICE: The vehicle is equipped with a Supplemental Restraint System (SRS) which includes components su
© 2016-2026 Copyright www.lexunx.com
