Lexus NX: Components
Lexus NX Service Manual / Vehicle Exterior / Lighting (ext) / License Plate Light Assembly / Components
COMPONENTS
ILLUSTRATION
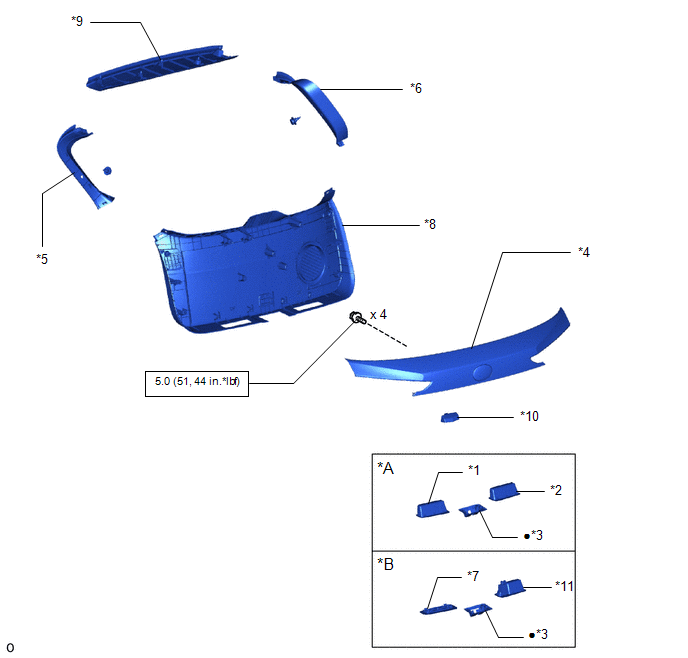
| *A | w/o Power Back Door System | *B | w/ Power Back Door System |
| *1 | BACK DOOR FINISH COVER LH | *2 | BACK DOOR FINISH COVER RH |
| *3 | BACK DOOR LOCK COVER | *4 | BACK DOOR OUTSIDE GARNISH SUB-ASSEMBLY |
| *5 | BACK DOOR SIDE GARNISH LH | *6 | BACK DOOR SIDE GARNISH RH |
| *7 | BACK DOOR TRIM BASE | *8 | BACK DOOR TRIM BOARD ASSEMBLY |
| *9 | CENTER BACK DOOR GARNISH | *10 | LICENSE PLATE LIGHT ASSEMBLY LH |
| *11 | PULL HANDLE | - | - |
.png) | N*m (kgf*cm, ft.*lbf): Specified torque | ● | Non-reusable part |
READ NEXT:
 Removal
REMOVAL CAUTION / NOTICE / HINT HINT:
Use the same procedure for the RH and LH sides.
The procedure described below is for the LH side.
PROCEDURE 1. REMOVE CENTER BACK DOOR GARNISH Click here
Inspection
INSPECTION PROCEDURE 1. INSPECT LICENSE PLATE LIGHT ASSEMBLY LH (a) Apply auxiliary battery voltage to the connector and check the light illumination condition. OK: Condition Specified Condit
Installation
INSTALLATION CAUTION / NOTICE / HINT HINT:
Use the same procedure for the RH and LH sides.
The procedure described below is for the LH side.
PROCEDURE 1. INSTALL LICENSE PLATE LIGHT ASSEMBLY L
SEE MORE:
Assist Map Number Mismatch (C1582)
DESCRIPTION When an incorrect hybrid vehicle control ECU, incorrect skid control ECU or incorrect main body ECU is installed after the assist map has been written in the power steering ECU assembly, DTC C1582 is stored because the data does not match the vehicle specifications. DTC No. Detectio
Diagnostic Trouble Code Chart
DIAGNOSTIC TROUBLE CODE CHART Vehicle Proximity Notification System DTC No. Detection Item Link B1350 Speaker Circuit U0129 Lost Communication with Brake System Control Module U0140 Lost Communication with Body Control Module U0293 Lost Communication wit
© 2016-2026 Copyright www.lexunx.com
