Lexus NX: Removal
REMOVAL
CAUTION / NOTICE / HINT
HINT:
- Use the same procedure for the RH and LH sides.
- The procedure described below is for the LH side.
PROCEDURE
1. REMOVE CENTER BACK DOOR GARNISH
Click here .gif)
2. REMOVE BACK DOOR SIDE GARNISH LH
Click here
3. REMOVE BACK DOOR SIDE GARNISH RH
Click here
4. REMOVE BACK DOOR FINISH COVER LH (w/o Power Back Door)
Click here
5. REMOVE BACK DOOR FINISH COVER RH (w/o Power Back Door)
Click here
6. REMOVE BACK DOOR TRIM BASE (w/ Power Back Door)
Click here
7. REMOVE PULL HANDLE (w/ Power Back Door)
Click here
8. REMOVE BACK DOOR LOCK COVER (w/o Power Back Door)
Click here
9. REMOVE BACK DOOR LOCK COVER (w/ Power Back Door)
Click here
10. REMOVE BACK DOOR TRIM BOARD ASSEMBLY
Click here
11. REMOVE BACK DOOR OUTSIDE GARNISH SUB-ASSEMBLY
Click here
12. REMOVE LICENSE PLATE LIGHT ASSEMBLY LH
| (a) Disconnect the connector. |
|
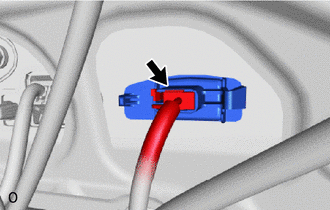
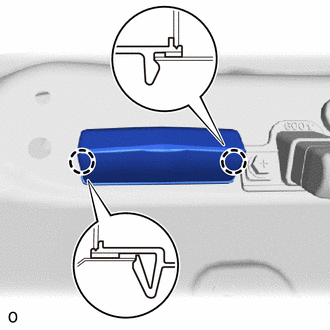
| (b) Detach the 2 claws and remove the license plate light assembly LH. |
|
READ NEXT:
 Inspection
INSPECTION PROCEDURE 1. INSPECT LICENSE PLATE LIGHT ASSEMBLY LH (a) Apply auxiliary battery voltage to the connector and check the light illumination condition. OK: Condition Specified Condit
Installation
INSTALLATION CAUTION / NOTICE / HINT HINT:
Use the same procedure for the RH and LH sides.
The procedure described below is for the LH side.
PROCEDURE 1. INSTALL LICENSE PLATE LIGHT ASSEMBLY L
SEE MORE:
Random / Multiple Cylinder Misfire Detected (P0300-P0304)
DESCRIPTION When the engine misfires, high concentrations of hydrocarbons (HC) enter the exhaust gas. Extremely high hydrocarbon concentration levels can cause an increase in exhaust emission levels. Extremely high concentrations of hydrocarbons can also cause increases in the three-way catalytic co
System Description
SYSTEM DESCRIPTION AUTOMATIC LIGHT CONTROL SYSTEM (a) When the headlight dimmer switch is in the AUTO position, the automatic light control system detects ambient light levels and controls the headlights, taillights, front fog lights, clearance lights and license plate lights. LIGHT AUTO TURN-OFF SY
