Lexus NX: Components
Lexus NX Service Manual / Vehicle Exterior / Lighting (ext) / Side Turn Signal Light Assembly / Components
COMPONENTS
ILLUSTRATION
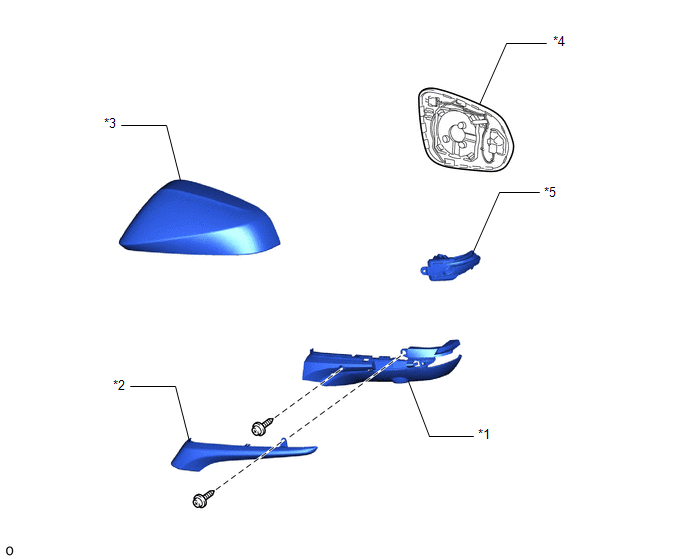
| *1 | LOWER OUTER MIRROR COVER LH | *2 | OUTER MIRROR BEZEL LH |
| *3 | OUTER MIRROR COVER LH | *4 | OUTER MIRROR LH |
| *5 | SIDE TURN SIGNAL LIGHT ASSEMBLY LH | - | - |
READ NEXT:
 Removal
REMOVAL CAUTION / NOTICE / HINT HINT:
Use the same procedure for the RH and LH sides.
The procedure described below is for the LH side.
PROCEDURE 1. REMOVE OUTER MIRROR LH Click here 2. REM
Inspection
INSPECTION PROCEDURE 1. INSPECT SIDE TURN SIGNAL LIGHT ASSEMBLY LH (a) Apply auxiliary battery voltage to the connector and check the light illumination condition. OK: Condition Specified Con
Installation
INSTALLATION CAUTION / NOTICE / HINT HINT:
Use the same procedure for the RH and LH sides.
The procedure described below is for the LH side.
PROCEDURE 1. INSTALL SIDE TURN SIGNAL LIGHT ASSEMBL
SEE MORE:
Hybrid vehicle driving tips
For economical and ecological
driving, pay attention to the following
points:
Using Eco mode
When using Eco mode, the torque corresponding
to the accelerator pedal
depression amount can be generated
more smoothly than it is in normal conditions.
In addition, the operation of the
air condi
Components
COMPONENTS ILLUSTRATION *1 CENTER INSTRUMENT CLUSTER FINISH PANEL ASSEMBLY *2 INSTRUMENT SIDE PANEL LH *3 INSTRUMENT SIDE PANEL RH *4 LOWER NO. 1 INSTRUMENT PANEL FINISH PANEL *5 NO. 1 INSTRUMENT PANEL SAFETY PAD SUB-ASSEMBLY *6 NO. 1 INSTRUMENT PANEL UNDER COVER SUB-AS
© 2016-2026 Copyright www.lexunx.com
