Lexus NX: Components
COMPONENTS
ILLUSTRATION
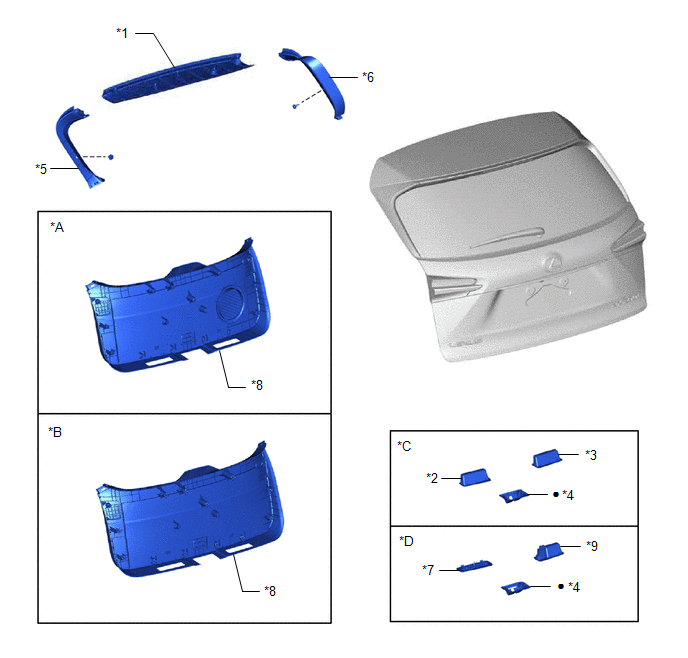
| *A | w/ Woofer | *B | w/o Woofer |
| *C | w/o Power Back Door | *D | w/ Power Back Door |
| *1 | BACK DOOR CENTER GARNISH | *2 | BACK DOOR FINISH COVER LH |
| *3 | BACK DOOR FINISH COVER RH | *4 | BACK DOOR LOCK COVER |
| *5 | BACK DOOR SIDE GARNISH LH | *6 | BACK DOOR SIDE GARNISH RH |
| *7 | BACK DOOR TRIM BASE | *8 | BACK DOOR TRIM BOARD ASSEMBLY |
| *9 | PULL HANDLE | - | - |
| ● | Non-reusable part | - | - |
ILLUSTRATION
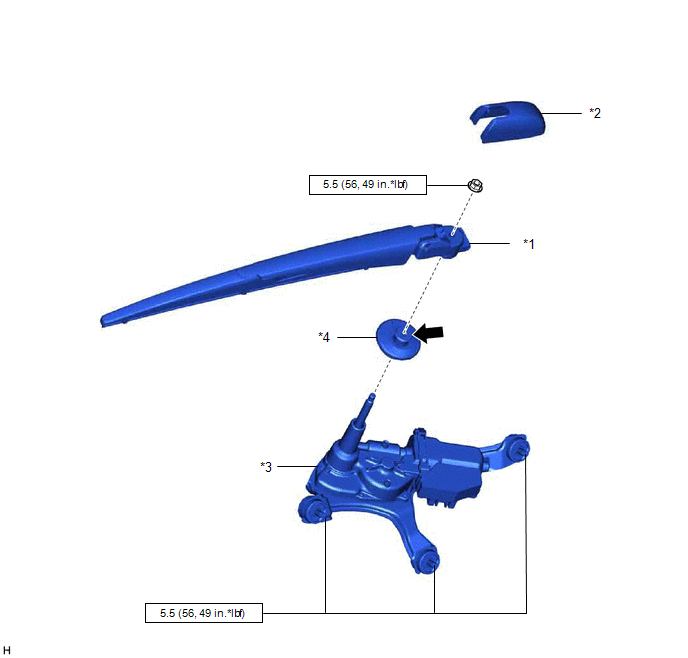
| *1 | REAR WIPER ARM AND BLADE ASSEMBLY | *2 | REAR WIPER ARM HEAD CAP |
| *3 | REAR WIPER MOTOR ASSEMBLY | *4 | REAR WIPER MOTOR GROMMET |
.png) | N*m (kgf*cm, ft.*lbf): Specified torque | .png) | MP grease |
READ NEXT:
 On-vehicle Inspection
ON-VEHICLE INSPECTION PROCEDURE 1. INSPECT REAR WIPER MOTOR ASSEMBLY (a) Check the automatic stop (park) position. (1) Operate the rear wiper motor assembly, and then stop the operation. Check the
Removal
REMOVAL PROCEDURE 1. REMOVE BACK DOOR CENTER GARNISH Click here 2. REMOVE BACK DOOR SIDE GARNISH LH Click here 3. REMOVE BACK DOOR SIDE GARNISH RH Click here 4. REMOVE BACK DOOR TRIM BASE (w/
Inspection
INSPECTION PROCEDURE 1. INSPECT REAR WIPER MOTOR ASSEMBLY *a Component without harness connected (Rear Wiper Motor Assembly) (a) Check that the rear wiper motor assembly operates. NOTICE: Che
SEE MORE:
Installation
INSTALLATION CAUTION / NOTICE / HINT HINT: Perform "Inspection After Repair" after replacing the EGR valve assembly. Click here PROCEDURE 1. INSTALL EGR VALVE ASSEMBLY HINT: Perform "Inspection After Repair" after replacing the EGR valve assembly. Click here (a) Install 2 new gaskets to the N
Installation
INSTALLATION PROCEDURE 1. INSTALL REMOTE OPERATION CONTROLLER ASSEMBLY (a) Install the remote operation controller assembly with the 4 bolts. 2. INSTALL UPPER REAR CONSOLE PANEL SUB-ASSEMBLY Click here 3. INSTALL UPPER REAR CONSOLE PANEL Click here 4. INSTALL CONSOLE ARMREST ASSEMBLY Click here
© 2016-2026 Copyright www.lexunx.com
