Lexus NX: On-vehicle Inspection
Lexus NX Service Manual / Vehicle Exterior / Wiper / Washer / Rear Wiper Motor / On-vehicle Inspection
ON-VEHICLE INSPECTION
PROCEDURE
1. INSPECT REAR WIPER MOTOR ASSEMBLY
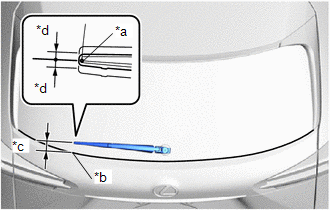
| (a) Check the automatic stop (park) position. (1) Operate the rear wiper motor assembly, and then stop the operation. Check the wiper arm automatic stop (park) position. OK: Rear wiper arm stops at the position shown in the illustration. HINT: After the wiper arm stops, lift it up 2 times and check the automatic stop (park) position. |
|
READ NEXT:
 Removal
REMOVAL PROCEDURE 1. REMOVE BACK DOOR CENTER GARNISH Click here 2. REMOVE BACK DOOR SIDE GARNISH LH Click here 3. REMOVE BACK DOOR SIDE GARNISH RH Click here 4. REMOVE BACK DOOR TRIM BASE (w/
Inspection
INSPECTION PROCEDURE 1. INSPECT REAR WIPER MOTOR ASSEMBLY *a Component without harness connected (Rear Wiper Motor Assembly) (a) Check that the rear wiper motor assembly operates. NOTICE: Che
Installation
INSTALLATION PROCEDURE 1. INSTALL REAR WIPER MOTOR GROMMET (a) Apply MP grease to the entire circumference of the lip portion of the rear wiper motor grommet. HINT: Do not fill the hole with MP gre
SEE MORE:
Problem Symptoms Table
PROBLEM SYMPTOMS TABLE HINT: Use the table below to help determine the cause of problem symptoms. If multiple suspected areas are listed, the potential causes of the symptoms are listed in order of probability in the "Suspected Area" column of the table. Check each symptom by checking the suspected
System Diagram
SYSTEM DIAGRAM Communication Table Sender Receiver Signal Line Radio Receiver Assembly Multi-display assembly Camera information signal GVIF Cable Radio Receiver Assembly Rear Television Camera Assembly Camera information signal CAN Communication Line Steering Sens
© 2016-2026 Copyright www.lexunx.com
