Lexus NX: Components
COMPONENTS
ILLUSTRATION
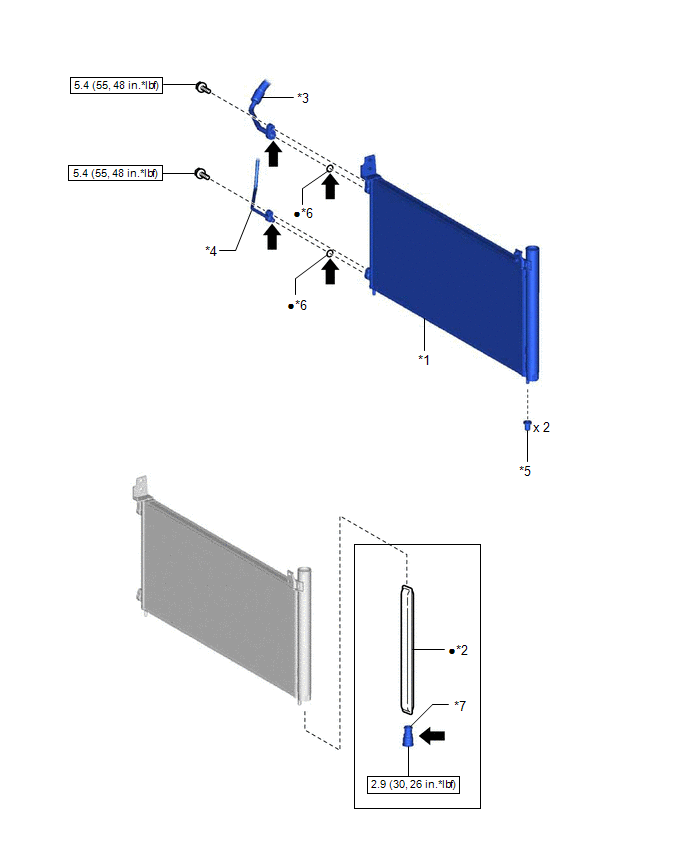
| *1 | COOLER CONDENSER ASSEMBLY | *2 | COOLER DRYER |
| *3 | DISCHARGE HOSE SUB-ASSEMBLY | *4 | LIQUID PIPE SUB-ASSEMBLY |
| *5 | NO. 1 COOLER CONDENSER CUSHION | *6 | O-RING |
| *7 | CAP | - | - |
.png) | N*m (kgf*cm, ft.*lbf): Specified torque | ● | Non-reusable part |
.png) | Compressor oil ND-OIL 11 or equivalent | - | - |
READ NEXT:
 Removal
REMOVAL PROCEDURE 1. RECOVER REFRIGERANT FROM REFRIGERATION SYSTEM Click here 2. REMOVE RADIATOR ASSEMBLY Click here 3. REMOVE FRONT BUMPER COVER (a) for Sport Package: Click here (b) except Spo
Disassembly
DISASSEMBLY PROCEDURE 1. REMOVE NO. 1 COOLER CONDENSER CUSHION (a) Remove the 2 No. 1 cooler condenser cushions from the cooler condenser assembly. 2. REMOVE COOLER DRYER (a) Using a
Reassembly
REASSEMBLY PROCEDURE 1. INSTALL COOLER DRYER (a) Using pliers, install a new cooler dryer to the modulator. *1 Modulator (b) Apply sufficient compressor oil to the O-ring
SEE MORE:
Operation Check
OPERATION CHECK CHECK NAVIGATION SYSTEM NORMAL CONDITION (a) If the cause of a symptom is any of the following, the corresponding symptom is normal; it is not a malfunction. Symptom Answer A longer route than expected is chosen. Depending on the road conditions, the navigation ECU may det
Lost Communication with Multi-axis Acceleration Sensor Module Missing Message (U012587,U012987,U014087,U029387)
DESCRIPTION DTC No. Detection Item DTC Detection Condition Trouble Area DTC Output from U012587 Lost Communication with Multi-axis Acceleration Sensor Module Missing Message Communication stop occurs between the forward recognition camera and airbag ECU assembly continuously for 5
© 2016-2026 Copyright www.lexunx.com
