Lexus NX: Components
COMPONENTS
ILLUSTRATION
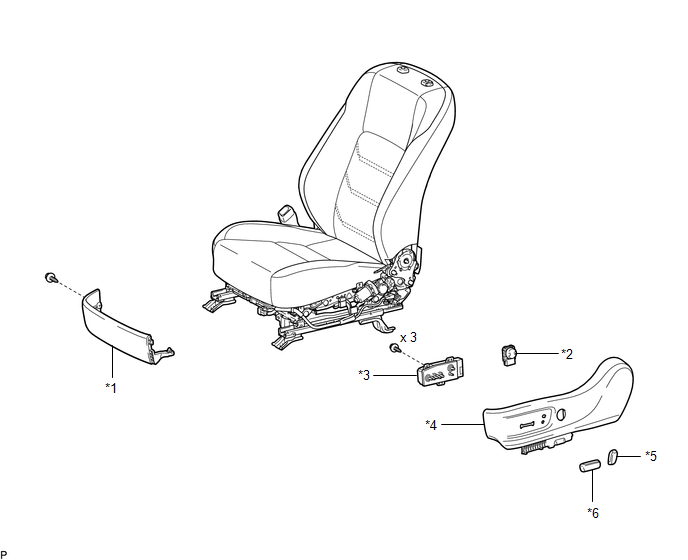
| *1 | FRONT LOWER SEAT CUSHION SHIELD | *2 | FRONT LUMBAR POWER SEAT SWITCH |
| *3 | FRONT POWER SEAT SWITCH LH | *4 | FRONT SEAT CUSHION SHIELD LH |
| *5 | POWER SEAT SWITCH KNOB LH | *6 | POWER SEAT SWITCH KNOB LH |
READ NEXT:
 Removal
REMOVAL PROCEDURE 1. REMOVE FRONT SEAT ASSEMBLY LH Click here 2. REMOVE FRONT LOWER SEAT CUSHION SHIELD Click here 3. REMOVE POWER SEAT SWITCH KNOB LH Click here 4. REMOVE POWER SEAT SWITCH KNO
Inspection
INSPECTION PROCEDURE 1. INSPECT FRONT LUMBAR POWER SEAT SWITCH (a) Measure the resistance according to the value(s) in the table below. Standard Resistance: Tester Connection Switch Condition
Installation
INSTALLATION PROCEDURE 1. INSTALL FRONT LUMBAR POWER SEAT SWITCH (a) Attach the 4 claws to install the front lumbar power seat switch. 2. INSTALL FRONT POWER SEAT SWITCH LH Click here 3. INSTALL FRO
SEE MORE:
Open in Rear Floor Electrical Key Oscillator Circuit (B27A6)
DESCRIPTION The certification ECU (smart key ECU assembly) generates a request signal and transmits the signal to the No. 2 indoor electrical key antenna assembly (rear floor). For the No. 2 indoor electrical key antenna assembly (rear floor) to detect when the electrical key transmitter sub-assembl
A/C Inverter Malfunction (B1474)
DESCRIPTION DTC No. Detection Item DTC Detection Condition Trouble Area Memory Note B1474 A/C Inverter Malfunction A/C inverter malfunction
Compressor with motor assembly
CAN communication system
Memorized - CAUTION / NOTICE / HINT CAUTION:
Wear insulated glo
© 2016-2026 Copyright www.lexunx.com
