Lexus NX: Components
COMPONENTS
ILLUSTRATION
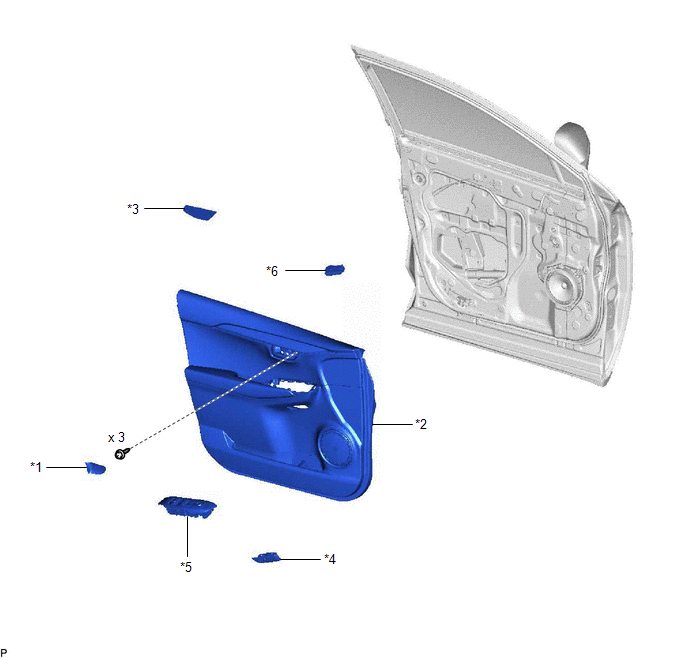
| *1 | FRONT DOOR INSIDE HANDLE BEZEL PLUG LH | *2 | FRONT DOOR TRIM BOARD SUB-ASSEMBLY LH |
| *3 | FRONT DOOR TRIM COVER LH | *4 | FRONT SEAT SLIDE SWITCH BEZEL |
| *5 | POWER WINDOW REGULATOR MASTER SWITCH ASSEMBLY WITH FRONT DOOR ARMREST BASE PANEL | *6 | SEAT MEMORY SWITCH |
READ NEXT:
 Removal
REMOVAL PROCEDURE 1. REMOVE FRONT DOOR TRIM COVER LH Click here 2. REMOVE FRONT DOOR INSIDE HANDLE BEZEL PLUG LH Click here 3. REMOVE POWER WINDOW REGULATOR MASTER SWITCH ASSEMBLY WITH FRONT DOO
Inspection
INSPECTION PROCEDURE 1. INSPECT SEAT MEMORY SWITCH (a) Measure the resistance according to the value(s) in the table below. Standard Resistance: Tester Connection Switch Condition Specified
Installation
INSTALLATION PROCEDURE 1. INSTALL FRONT SEAT SLIDE SWITCH BEZEL (a) Attach the 6 claws to install the front seat slide switch bezel. 2. INSTALL SEAT MEMORY SWITCH (a) Attach the 4 claws to install the
SEE MORE:
Vehicle Speed Signal (C1541)
DESCRIPTION The power steering ECU assembly receives vehicle speed signals from the skid control ECU via CAN communication. The ECU provides appropriate assisting force in accordance with the vehicle speed based on the signals. DTC No. Detection Item DTC Detection Condition Trouble Area W
Parts Location
PARTS LOCATION ILLUSTRATION *1 AIRBAG ECU ASSEMBLY *2 PARKING BRAKE ECU ASSEMBLY *3 AIR CONDITIONING CONTROL ASSEMBLY *4 HYBRID VEHICLE CONTROL ECU *5 BRAKE BOOSTER WITH MASTER CYLINDER ASSEMBLY (SKID CONTROL ECU) *6 ENGINE ROOM RELAY BLOCK
- METER NO.1 FUSE
*
© 2016-2026 Copyright www.lexunx.com
