Lexus NX: Cooling System
On-vehicle Inspection
ON-VEHICLE INSPECTION
PROCEDURE
1. INSPECT FOR COOLANT LEAK
CAUTION:
To avoid the danger of being burned, do not remove the radiator reservoir cap while the engine assembly and radiator assembly are still hot. Thermal expansion will cause hot engine coolant and steam to blow out from the radiator reservoir assembly.
(a) Remove the reservoir cap.
(b) Fill the radiator reservoir assembly with engine coolant, and then attach a radiator cap tester.
(c) Put the engine in inspection mode (maintenance mode).
Click here .gif)
(d) Warm up the engine.
| (e) Using the radiator cap tester, increase the pressure inside the radiator to 118 kPa (1.2 kgf/cm2, 17 psi), and then check that the pressure does not drop. If the pressure drops, check the hoses, radiator assembly and engine water pump assembly for leakage. If there are no signs of external coolant leaks, check the heater core, cylinder block and cylinder head sub-assembly. |
|
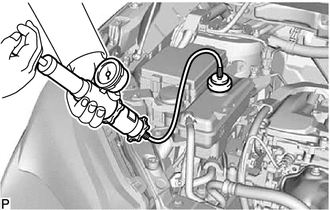
(f) Install the reservoir cap.
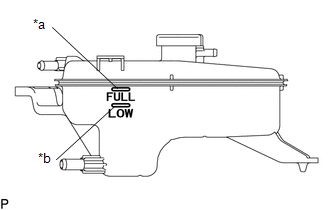
2. INSPECT ENGINE COOLANT LEVEL
| (a) Check that the engine coolant level is between the LOW and FULL lines when the engine is cold. If the level is low, check for leakage and add TOYOTA Super Long Life Coolant (SLLC) or similar high quality ethylene glycol based non-silicate, non-amine, non-nitrite, and non-borate coolant with long-life hybrid organic acid technology up to the FULL line. NOTICE: Do not substitute plain water for engine coolant. |
|
3. INSPECT ENGINE COOLANT QUALITY
CAUTION:
To avoid the danger of being burned, do not remove the radiator reservoir cap while the engine assembly and radiator assembly are still hot. Thermal expansion will cause hot engine coolant and steam to blow out from the radiator assembly.
(a) Remove the reservoir cap.
(b) Check for any excessive deposits of rust or scale around the reservoir cap and check that the coolant is free of oil.
If the coolant is excessively dirty, replace the coolant.
(c) Install the reservoir cap.
READ NEXT:
 Components
COMPONENTS ILLUSTRATION *A for 2WD *B for AWD *1 HOOD LOCK ASSEMBLY *2 NO. 6 INVERTER BRACKET *3 UPPER RADIATOR SUPPORT SUB-ASSEMBLY *4 FRONT RADIATOR SIDE AIR GUIDE PLAT
On-vehicle Inspection
ON-VEHICLE INSPECTION PROCEDURE 1. INSPECT RESERVOIR CAP (a) Measure the valve opening pressure. *a O-Ring *b Rubber Packing (1) If there are water stains or foreign matter on the O-rin
SEE MORE:
Components
COMPONENTS ILLUSTRATION *1 HV WATER PUMP BRACKET SUB-ASSEMBLY *2 NO. 1 ENGINE UNDER COVER ASSEMBLY *3 NO. 2 INVERTER COOLING HOSE ASSEMBLY *4 WATER PUMP WITH MOTOR *5 NO. 2 INVERTER COOLING HOSE *6 NO. 3 INVERTER COOLING HOSE *7 WATER PUMP WITH MOTOR CONNECTOR -
G Sensor Failure (C1647)
DESCRIPTION The clearance warning sonar ECU assembly communicates with the airbag ECU assembly (yaw rate and acceleration sensor) via CAN communication, and if it is determined that the airbag ECU assembly (yaw rate and acceleration sensor) is malfunctioning, DTC C1647 is stored. DTC No. Detect
