Lexus NX: Disassembly
DISASSEMBLY
PROCEDURE
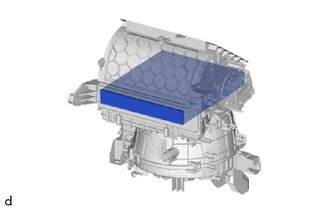
1. REMOVE AIR FILTER CASE
| (a) Detach the claw and guide and remove the air filter case. |
|

2. REMOVE AIR REFINER ELEMENT
| (a) Remove the air refiner element. |
|
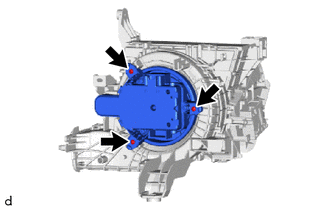
3. REMOVE BLOWER WITH FAN MOTOR SUB-ASSEMBLY
| (a) Remove the 3 screws and the blower with fan motor sub-assembly. |
|
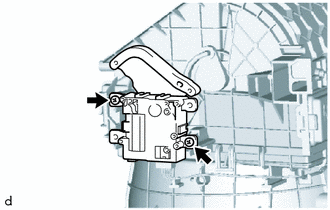
4. REMOVE NO. 1 BLOWER DAMPER SERVO SUB-ASSEMBLY
| (a) Remove the 2 screws and No. 1 blower damper servo sub-assembly. |
|
READ NEXT:
 Reassembly
REASSEMBLY PROCEDURE 1. INSTALL NO. 1 BLOWER DAMPER SERVO SUB-ASSEMBLY (a) Install the link of the No. 1 blower damper servo sub-assembly to the link of the blower assembly as shown in the illustra
Installation
INSTALLATION PROCEDURE 1. INSTALL BLOWER ASSEMBLY (a) Attach the 2 claws to install the blower assembly. (b) Install the 2 screws. (c) Attach the 3 clamps to install the air conditioning harness assem
SEE MORE:
Installation
INSTALLATION PROCEDURE 1. INSTALL AIR CONDITIONER PRESSURE SENSOR (a) Remove the vinyl tape from the liquid pipe sub-assembly and the connecting part of the air conditioner pressure sensor. (b) Apply sufficient compressor oil to the O-ring of a new air conditioner pressure sensor and the connecting
Problem Symptoms Table
PROBLEM SYMPTOMS TABLE NOTICE: If the headlight ECU sub-assembly LH has been replaced, it is necessary to synchronize the vehicle information and initialize the headlight ECU sub-assembly LH. Click here HINT:
Use the table below to help determine the cause of problem symptoms. If multiple susp
© 2016-2026 Copyright www.lexunx.com
