Lexus NX: Disassembly
DISASSEMBLY
PROCEDURE
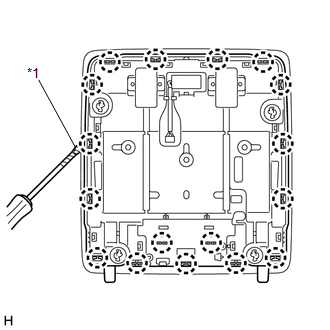
1. REMOVE MAP LIGHT SUB-ASSEMBLY
| (a) Using a screwdriver, detach the 17 claws and remove the map light sub-assembly. HINT: Tape the screwdriver tip before use. |
|
READ NEXT:
 Inspection
INSPECTION PROCEDURE 1. INSPECT MAP LIGHT ASSEMBLY (PERSONAL LIGHT) (a) Inspect the front map light. (1) Apply battery voltage to the connector and check the light illumination condition. OK: M
Reassembly
REASSEMBLY PROCEDURE 1. INSTALL MAP LIGHT SUB-ASSEMBLY (a) Attach the 17 claws to install the map light sub-assembly.
Installation
INSTALLATION PROCEDURE 1. INSTALL MAP LIGHT ASSEMBLY (PERSONAL LIGHT) (a) Connect the connectors. (b) Attach the 4 clips to install the map light assembly (personal light).
SEE MORE:
Installation
INSTALLATION CAUTION / NOTICE / HINT HINT:
Use the same procedure for the RH and LH sides.
The procedure listed below is for the LH side.
PROCEDURE 1. INSTALL SST (a) Align the cutout on end of the shock rod of the front shock absorber assembly LH with the installation position. NOTICE: Be s
Dtc Check / Clear
DTC CHECK / CLEAR CHECK FOR DTC (a) Connect the Techstream to the DLC3. (b) Turn the power switch on (IG). (c) Turn the Techstream on. (d) Enter the following menus: Body Electrical / AFS / Trouble Codes. Body Electrical > AFS > Trouble Codes (e) Check for DTCs. CLEAR DTC (a) Connect the Techs
© 2016-2026 Copyright www.lexunx.com
