Lexus NX: Installation
INSTALLATION
PROCEDURE
1. INSTALL MAP LIGHT ASSEMBLY (PERSONAL LIGHT)
| (a) Connect the connectors. |
|
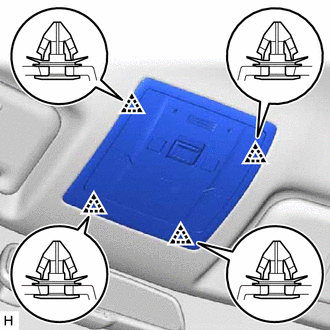
(b) Attach the 4 clips to install the map light assembly (personal light).
READ NEXT:
 Rear Door Courtesy Switch
ComponentsCOMPONENTS ILLUSTRATION *1 REAR DOOR COURTESY LIGHT SWITCH ASSEMBLY - - N*m (kgf*cm, ft.*lbf): Specified torque - - RemovalREMOVAL CAUTION / NOTICE / HINT HINT:
Relay
On-vehicle InspectionON-VEHICLE INSPECTION PROCEDURE 1. INSPECT LIGHT CUT RELAY (a) Remove the upper instrument panel sub-assembly. Click here (b) Remove the light cut relay. (c
Room Light
ComponentsCOMPONENTS ILLUSTRATION *A for Normal Roof *B for Sliding Roof *C for Glass Roof - - *1 SPOT LIGHT ASSEMBLY (ROOM LIGHT) - - RemovalREMOVAL PROCEDURE 1. RE
SEE MORE:
Internal Control Module Software Incompatibility Not Programmed (U030051,U030057)
DESCRIPTION
When the forward recognition camera is unable to determine the vehicle information from the vehicle information sent from the hybrid vehicle control ECU, the forward recognition camera outputs U030051.
When the vehicle information sent from the hybrid vehicle control ECU does not ma
Energy monitor/fuel consumption
screen
You can view the status of your
hybrid system on the multi-information
display and the navigation/multimedia
system display.
The energy monitor or fuel consumption
screen can be displayed
and operated on the side display.
System components
Multi-information display
Navigation/multim
© 2016-2026 Copyright www.lexunx.com
