.gif)
- Unset or Set is not displayed normally on the Techstream screen according to the front passenger side seat belt condition
- NG is displayed on the Techstream screen
Lexus NX: Front Passenger Side Seat Belt Warning Light Malfunction
Lexus NX Service Manual / Vehicle Interior / Seat Belt / Seat Belt Warning System / Front Passenger Side Seat Belt Warning Light Malfunction
DESCRIPTION
When the power switch is turned on (IG), the occupant detection ECU sends a signal to the airbag ECU assembly to indicate the state of the front seat inner belt assembly RH and also whether the front passenger seat is occupied. The airbag ECU assembly sends those signals to the combination meter assembly via CAN communication. The combination meter assembly illuminates, blinks or turns off the front seat belt warning light on the combination meter assembly in accordance with these signals.
HINT:
The front seat belt warning light on the combination meter assembly is used for both the driver side seat and front passenger side seat.
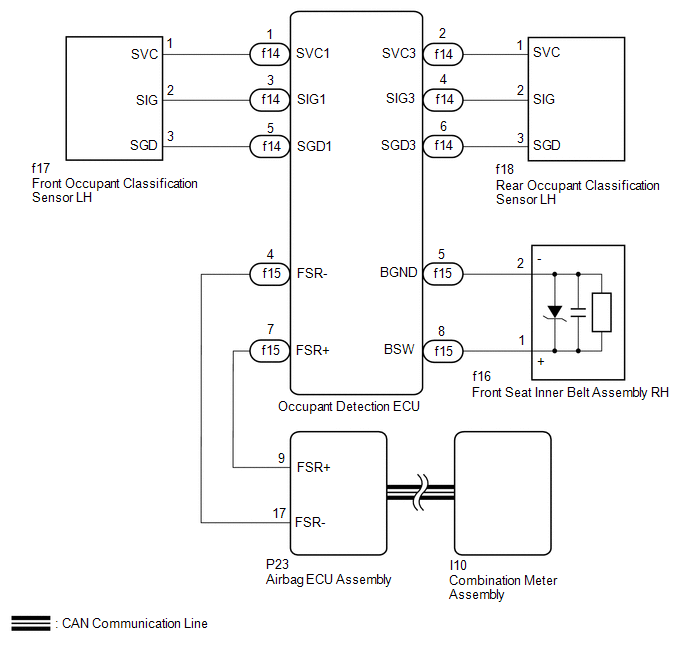
WIRING DIAGRAM
CAUTION / NOTICE / HINT
NOTICE:
-
The seat belt warning system uses the CAN communication system. First, confirm that there is no malfunction in the CAN communication system. Refer to the How to Proceed with Troubleshooting procedure.
Click here
.gif)
- When replacing the combination meter assembly, make sure to replace it with a new one.
-
After replacing the airbag ECU assembly, refer to initialization.
Click here
PROCEDURE
| 1. | CHECK FOR DTC (OCCUPANT CLASSIFICATION SYSTEM) |
(a) Clear the DTCs.
Click here
(b) Check for DTCs.
Click here
OK:
DTCs are not output.
| NG | .gif) | GO TO OCCUPANT CLASSIFICATION SYSTEM |
|
| 2. | CHECK FOR DTC (AIRBAG SYSTEM) |
(a) Clear the DTCs.
Click here
(b) Check for DTCs.
Click here
OK:
DTCs are not output.
| NG | | GO TO AIRBAG SYSTEM |
|
| 3. | READ VALUE USING TECHSTREAM (PASSENGER BUCKLE SW) |
(a) Connect the Techstream to the DLC3.
(b) Turn the power switch on (IG).
(c) Turn the Techstream on.
(d) Enter the following menus: Body Electrical / Occupant Detection / Data List.
(e) Read the Data List according to the display on the Techstream.
Body Electrical > Occupant Detection > Data List| Tester Display | Measurement Item | Range | Normal Condition | Diagnostic Note |
|---|---|---|---|---|
| Passenger Buckle SW | Front passenger side buckle switch | Set, Unset or NG | Unset: Seat belt not fastened Set: Seat belt fastened NG: Data is not determined | Perform the inspection while sitting in the front passenger side seat. |
| Tester Display |
|---|
| Passenger Buckle SW |
| Result | Proceed to |
|---|---|
| Unset or Set is displayed on the Techstream screen according to the front passenger side seat belt condition | A |
| Unset or Set is not displayed normally on the Techstream screen according to the front passenger side seat belt condition | B |
| NG is displayed on the Techstream screen | C |
| B | | REPLACE FRONT SEAT INNER BELT ASSEMBLY RH |
| C | | REPLACE OCCUPANT DETECTION ECU |
|
| 4. | READ VALUE USING TECHSTREAM (RIGHT SIDE BUCKLE SW) |
(a) Connect the Techstream to the DLC3.
(b) Turn the power switch on (IG).
(c) Turn the Techstream on.
(d) Enter the following menus: Body Electrical / SRS Airbag / Data List.
(e) Read the Data List according to the display on the Techstream.
Body Electrical > SRS Airbag > Data List| Tester Display | Measurement Item | Range | Normal Condition | Diagnostic Note |
|---|---|---|---|---|
| Right side Buckle SW | Front passenger side buckle switch | Unset, Set or NG | Unset: Seat belt not fastened Set: Seat belt fastened NG: Data is not determined | Perform the inspection while sitting in the front passenger side seat. |
| Tester Display |
|---|
| Right side Buckle SW |
| Result | Proceed to |
|---|---|
| Unset or Set is displayed on the Techstream screen according to the front passenger side seat belt condition | A |
| | B |
| A | | REPLACE COMBINATION METER ASSEMBLY |
| B | | REPLACE AIRBAG ECU ASSEMBLY |
READ NEXT:
 Rear Seat Belt Warning Light Malfunction
DESCRIPTION The main body ECU (multiplex network body ECU) detects whether either rear door is open or closed based on the condition of the left and right courtesy light switches and then sends the re
Tongue Plate Stopper
ComponentsCOMPONENTS ILLUSTRATION *1 TONGUE PLATE STOPPER - - ● Non-reusable part - - ReplacementREPLACEMENT PROCEDURE 1. REMOVE TONGUE PLATE STOPPER (a) Slide the tongue
SEE MORE:
Compass
The compass on the inside rear
view mirror indicates the direction
in which the vehicle is heading.
Operation and displays
To turn the compass on or off, press the
button for more than 3 seconds.
Directions are displayed as follows:
■Conditions unfavorable to correct
operation
The com
Seat Belt Buckle Switch (LH) (B1656)
DESCRIPTION The seat belt buckle switch LH circuit consists of the airbag ECU assembly and front seat inner belt assembly LH. DTC B1656 is stored when a malfunction is detected in the seat belt buckle switch LH circuit. DTC No. Detection Item DTC Detection Condition Trouble Area B1656
© 2016-2026 Copyright www.lexunx.com
