Lexus NX: Headlight Cleaner Control Relay(for Triple Beam Headlight)
Lexus NX Service Manual / Vehicle Exterior / Wiper / Washer / Headlight Cleaner Control Relay(for Triple Beam Headlight)
On-vehicle Inspection
ON-VEHICLE INSPECTION
PROCEDURE
1. INSPECT HEADLIGHT CLEANER CONTROL RELAY
(a) Remove the headlight cleaner control relay.
| (b) Measure the resistance according to the value(s) in the table below. Standard Resistance:
If the result is not as specified, replace the headlight cleaner control relay. |
|
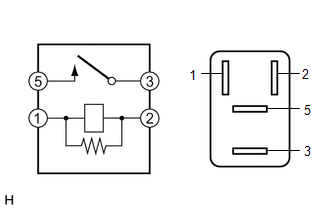
(c) Install the headlight cleaner control relay.
READ NEXT:
 Headlight Cleaner Motor
ComponentsCOMPONENTS ILLUSTRATION *1 FRONT BUMPER ASSEMBLY *2 HEADLIGHT CLEANER MOTOR AND PUMP ASSEMBLY RemovalREMOVAL PROCEDURE 1. REMOVE FRONT BUMPER ASSEMBLY Click here 2. REMOVE
Components
COMPONENTS ILLUSTRATION *1 RAIN SENSOR *2 RAIN SENSOR COVER *3 RAIN SENSOR TAPE - -
SEE MORE:
Replacement
REPLACEMENT PROCEDURE 1. REMOVE NO. 1 ENGINE UNDER COVER Click here 2. DRAIN COOLANT (for Inverter Coolant) NOTICE: Collect the drained coolant and measure its volume to establish a benchmark. When adding coolant, make sure to add more coolant than the measured amount. (a) Remove the inverter re
Removal
REMOVAL PROCEDURE 1. REMOVE NO. 1 SPEAKER WITH BOX ASSEMBLY (w/ ASC System) Click here 2. REMOVE REAR CONSOLE BOX ASSEMBLY (w/o ASC System) Click here 3. DISCONNECT TRANSMISSION CONTROL CABLE ASSEMBLY Click here 4. REMOVE INVERTER WITH CONVERTER ASSEMBLY Click here 5. REMOVE NO. 1 ENGINE U
© 2016-2026 Copyright www.lexunx.com
