Lexus NX: Installation
INSTALLATION
PROCEDURE
1. INSTALL HOOD LOCK CONTROL CABLE ASSEMBLY
| (a) Tie the string that was passed through the engine compartment room to the end of the hood lock control cable assembly as shown in the illustration. HINT: Use a length of string long enough to pass through the engine compartment room. |
|
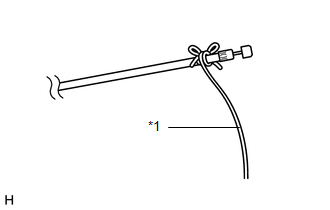
(b) Pass the hood lock control cable assembly through the vehicle body, and then attach each clamp.
(c) Untie the string from the hood lock control cable assembly.
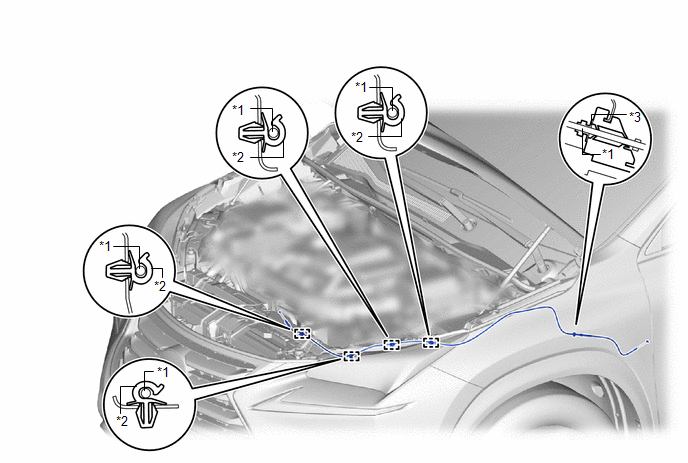
| *1 | Hood Lock Control Cable Assembly | *2 | Clamp |
| *3 | Stopper | - | - |
2. INSTALL HOOD LOCK CONTROL LEVER SUB-ASSEMBLY
(a) Connect the hood lock control cable assembly to the hood lock control lever sub-assembly.
(b) Attach the 3 claws to install the hood lock control lever sub-assembly.
3. INSTALL NO. 1 INSTRUMENT PANEL UNDER COVER SUB-ASSEMBLY
Click here .gif)
4. INSTALL COWL SIDE TRIM BOARD LH
Click here
5. INSTALL DOOR SCUFF PLATE ASSEMBLY LH
Click here
6. INSTALL HOOD TO FRONT FENDER SEAL LH
(a) Attach the clip to install the hood to front fender seal LH.
7. INSTALL CENTER HOOD CUSHION
(a) Attach the 2 claws to install the center hood cushion.
8. INSTALL HOOD LOCK ASSEMBLY
Click here
9. INSTALL RADIATOR SUPPORT OPENING COVER
Click here
READ NEXT:
 Hood Support
ComponentsCOMPONENTS ILLUSTRATION *1 HOOD STAY BRACKET LH *2 HOOD SUPPORT ASSEMBLY *3 STOP RING - - N*m (kgf*cm, ft.*lbf): Specified torque - - RemovalREMOVAL CAUTI
Components
COMPONENTS ILLUSTRATION *1 KICK DOOR CONTROL BRACKET *2 KICK DOOR CONTROL SENSOR
SEE MORE:
Disc cannot be Ejected
CAUTION / NOTICE / HINT NOTICE: When replacing the radio receiver assembly, always replace it with a new one. If a radio receiver assembly which was installed to another vehicle is used, the following may occur:
A communication malfunction DTC may be stored.
The radio receiver assembly may not
Touch Pad Memory Module Malfunction (B155B)
DESCRIPTION This DTC is stored if the remote operation controller assembly (remote touch) detects a malfunction in itself, such as internal hardware failure or touch pad memory module malfunction. DTC No. Detection Item DTC Detection Condition Trouble Area B155B Touch Pad Memory Modul
