Lexus NX: Installation
INSTALLATION
CAUTION / NOTICE / HINT
HINT:
- Use the same procedure for the RH and LH sides.
- The procedure described below is for the LH side.
PROCEDURE
1. INSTALL HEADLIGHT ASSEMBLY LH
(a) Connect the connector and lock the connector lock lever.
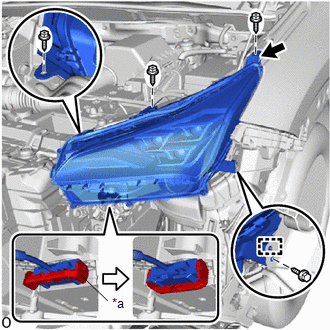
| *a | Connector Lock Lever |
.png) | Connect the Seat of the Screw |
(b) Attach the guide to set the headlight assembly LH.
(c) Connect the seat of the screw at the location indicated by the black arrow shown in the illustration and set the headlight assembly LH in place.
(d) Install the bolt and 3 screws.
Torque:
for Bolt :
5.4 N·m {55 kgf·cm, 48 in·lbf}
2. INSTALL FRONT BUMPER ASSEMBLY
(a) except Sport Package:
Click here .gif)
(b) for Sport Package:
Click here
3. PERFORM INITIALIZATION (When Replacing The Headlight Assembly LH or Headlight Light Control ECU Sub-assembly LH)
NOTICE:
-
If any of the work in the table below has been performed, vehicle information registration and initialization of the headlight ECU sub-assembly LH is necessary.
Click here
Performed Work or System Condition
Necessary Procedures
Replacement of the headlight ECU sub-assembly LH
Vehicle information registration for the headlight ECU sub-assembly LH
Initialization of the headlight ECU sub-assembly LH
Replacement of the headlight assembly LH
Vehicle information registration for the headlight ECU sub-assembly LH
Initialization of the headlight ECU sub-assembly LH
- A new headlight ECU sub-assembly LH cannot operate until the vehicle information is registered.
- After replacing the headlight ECU sub-assembly LH, it is necessary to register the vehicle information and then perform initialization.
- Even if the headlight ECU sub-assembly RH is replaced with a new one, vehicle information registration and initialization are not necessary.
- Vehicle information registration must be performed with the multiplex network body ECU (main body ECU) and ECM connected via CAN communication.
4. ADJUST HEADLIGHT AIMING
Click here
READ NEXT:
 Repair
REPAIR CAUTION / NOTICE / HINT HINT:
Use the same procedure for the RH and LH sides.
The procedure listed below is for the LH side.
If the installation area of the headlight assembly is damaged
Precaution
PRECAUTION NOTICE: When disassembling the headlight assembly, use static electricity countermeasures SST (desktop antistatic mat set) and observe all precautions to prevent damage to the system by ele
SEE MORE:
Problem Symptoms Table
PROBLEM SYMPTOMS TABLE HINT:
Use the table below to help determine the cause of problem symptoms. If multiple suspected areas are listed, the potential causes of the symptom are listed in order of probability in the "Suspected Area" column of the table. Check each symptom by checking the suspecte
Automatic air conditioning system
Air outlets and fan speed are automatically adjusted according to the
temperature
setting.
Press the "MENU" button on the Remote Touch, then select
to display the
air conditioning control screen.
The air conditioning system can be displayed and operated on the side display.
Air conditi
