Lexus NX: On-vehicle Inspection
ON-VEHICLE INSPECTION
CAUTION / NOTICE / HINT
HINT:
Perform "Inspection After Repair" after replacing an ignition coil assembly or spark plug.
Click here .gif)
PROCEDURE
1. PERFORM SPARK TEST
(a) Check for DTCs.
Click here
NOTICE:
If any DTC is output, perform troubleshooting procedures for that DTC.
(b) Remove the 4 ignition coils and 4 spark plugs.
Click here
| (c) Disconnect the 4 injector connectors. |
|
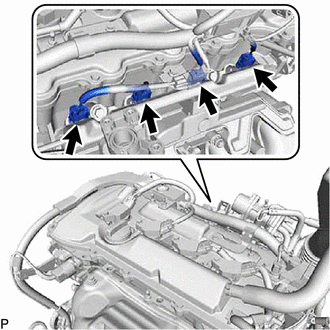
| (d) Install the spark plug to the ignition coil assembly and connect the connector. |
|
(e) Connect the Techstream to the DLC3.
(f) Put the engine in inspection mode (maintenance mode).
Click here
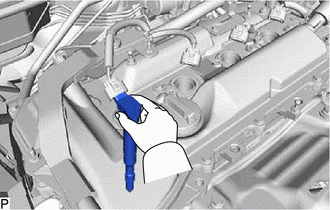
(g) Ground the spark plug.
(h) Visually check that sparks occur while the engine is being cranked.
NOTICE:
- When performing the inspection, be sure to ground the hexagonal portion or the threaded portion of the spark plug.
- Do not crank the engine for more than 2 seconds.
- If an ignition coil assembly is struck or dropped, replace it with a new one.
- If a spark plug is struck or dropped, replace it with a new one.
2. INSPECT IGNITION COIL AND SPARK TEST
HINT:
Perform "Inspection After Repair" after replacing an ignition coil assembly or spark plug.
Click here
(a) Spark test flowchart.
(1) Check that the wire harness side connector of the ignition coil with igniter is securely connected.
Result| Result | Proceed to |
|---|---|
| NG | Connect securely |
| OK | Go to next step |
(2) Perform a spark test on a malfunctioning ignition coil with igniter.
- Replace the ignition coil with a normal one.
- Perform the spark test again.
| Result | Proceed to |
|---|---|
| OK | Replace ignition coil assembly |
| NG | Go to next step |
(3) Inspect the spark plugs.
- If there is a cylinder in which ignition does not occur, interchange the spark plug of that cylinder and the spark plug of a cylinder in which ignition properly occurs.
-
Check that sparks occur in the cylinder in which the properly functioning spark plug was installed.
Result
Proceed to
OK
Replace the spark plug
NG
Inspect the ignition system
NOTICE:
- If an ignition coil assembly is struck or dropped, replace it with a new one.
- If a spark plug is struck or dropped, replace it with a new one.
(4) Connect the 4 injector connectors.
(5) Install the 4 ignition coils and 4 spark plugs.
Click here
(b) Clear DTCs.
Click here
3. CHECK SPARK PLUG
NOTICE:
- Do not use a wire brush for cleaning.
- Do not adjust the electrode gap of a used spark plug.
HINT:
Perform "Inspection After Repair" after replacing an spark plug.
Click here
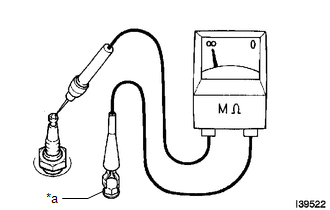
| (a) Check the electrode. (1) Using a megohmmeter, measure the insulation resistance. Standard Insulation Resistance:
HINT:
|
|
(b) Alternative inspection method:
(1) Put the engine in inspection mode (maintenance mode).
Click here
(2) Start the engine.*
(3) Increase the engine speed to 2500 rpm and then let the engine speed decrease. Perform this operation 5 times.*
NOTICE:
*: Do not perform this step if P0300 (misfire detection) or a related DTC is stored.
(4) Remove the spark plug.
Click here
(5) Visually check the spark plug.
If the electrode is dry, the spark plug is functioning properly. If the electrode is damp, proceed to the next step.
(c) Check the spark plug for any damage on its threads and insulator.
If there is damage, replace the spark plug.
Recommended Spark Plug:
| Manufacturer | Spark Plug Type |
|---|---|
| DENSO | FK16HR-A8 |
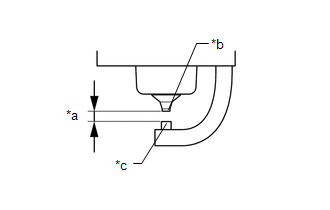
| (d) Check the spark plug electrode gap. Maximum electrode gap for used spark plug: 1.1 mm (0.0433 in.) NOTICE: Never attempt to adjust the gap of a used plug. If the gap is more than the maximum, replace the spark plug. Electrode gap for new spark plug: 0.7 to 0.8 mm (0.0276 to 0.0315 in.) |
|
(e) Clean the spark plugs.
If the electrode has traces of wet carbon, clean the electrode with a spark plug cleaner, and then dry it.
Standard air pressure:
588 kPa (6.0 kgf/cm2, 85 psi)
Standard duration:
20 seconds or less
HINT:
Only use a spark plug cleaner when the electrode is free of oil. If the electrode has traces of oil, use gasoline to clean off the oil before using the spark plug cleaner.
(f) Install the spark plug.
Click here
READ NEXT:
 Knock Sensor
ComponentsCOMPONENTS ILLUSTRATION *1 KNOCK CONTROL SENSOR - - N*m (kgf*cm, ft.*lbf) : Specified torque - - RemovalREMOVAL PROCEDURE 1. REMOVE INTAKE MANIFOLD Click here 2
Manifold Absolute Pressure Sensor
ComponentsCOMPONENTS ILLUSTRATION *1 MANIFOLD ABSOLUTE PRESSURE SENSOR *2 VACUUM HOSE N*m (kgf*cm, ft.*lbf): Specified torque - - On-vehicle InspectionON-VEHICLE INSPECTION P
Mass Air Flow Meter
ComponentsCOMPONENTS ILLUSTRATION *1 MASS AIR FLOW METER SUB-ASSEMBLY - - On-vehicle InspectionON-VEHICLE INSPECTION CAUTION / NOTICE / HINT NOTICE:
Perform the mass air flow meter s
SEE MORE:
Parts Location
PARTS LOCATION ILLUSTRATION *1 INNER REAR VIEW MIRROR ASSEMBLY *2 OUTER REAR VIEW MIRROR ASSEMBLY LH *3 OUTER REAR VIEW MIRROR ASSEMBLY RH *4 OUTER MIRROR LH *5 OUTER MIRROR RH *6 OUTER MIRROR CONTROL ECU ASSEMBLY LH *7 OUTER MIRROR CONTROL ECU ASSEMBLY RH *8
Accessory Socket System
Parts LocationPARTS LOCATION ILLUSTRATION *1 VOLTAGE INVERTER ASSEMBLY *2 NO. 2 POWER OUTLET SOCKET ASSEMBLY *3 INSTRUMENT PANEL JUNCTION BLOCK ASSEMBLY - ECU-IG NO.1 FUSE *4 NO. 2 ENGINE ROOM RELAY BLOCK - INV FUSE *5 NO. 3 RELAY BLOCK - INV RELAY - System Di
