Lexus NX: On-vehicle Inspection
ON-VEHICLE INSPECTION
PROCEDURE
1. INSPECT FOR COOLANT LEAK (for Inverter Coolant)
(a) Remove the inverter reserve tank cap.
CAUTION:
To avoid the danger of being burned, do not remove the inverter reserve tank cap while the coolant for the inverter is still hot.
| (b) Install a radiator cap tester. |
|
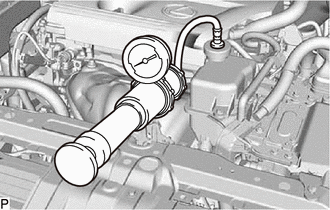
(c) Pump the radiator cap tester to 137 kPa (1.4 kgf/ cm2, 19.8 psi), and then check that the pressure does not drop.
HINT:
If the pressure drops, check the hoses, radiator, water pump, and inverter with converter assembly for leaks.
(d) Remove the radiator cap tester, and install the inverter reserve tank cap.
2. INSPECT COOLANT LEVEL IN RESERVE TANK (for Inverter Coolant)
(a) The coolant should be between the LOW and FULL lines in the reserve tank when the coolant for the inverter is cold.
HINT:
If the coolant level is low, check for leaks and add TOYOTA Super Long Life Coolant (SLLC) or similar high quality ethylene glycol based non-silicate, non-amine, non-nitrite, and non-borate coolant with long-life hybrid organic acid technology up to the FULL line.
3. INSPECT COOLANT QUALITY (for Inverter Coolant)
(a) Remove the inverter reserve tank cap.
CAUTION:
To avoid the danger of being burned, do not remove the inverter reserve tank cap while the coolant for the inverter is still hot.
(b) Check for excessive deposits of rust or scale on and around the inverter reserve tank cap and its opening.
HINT:
If excessively dirty, clean the inverter reserve tank cap, and replace the coolant (for inverter coolant).
(c) Install the inverter reserve tank cap.
4. CHECK INVERTER RESERVE TANK CAP
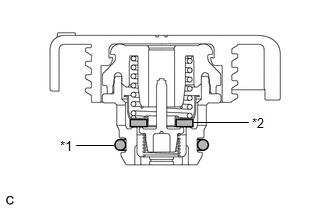
| (a) Check inverter reserve tank cap condition (1) If there are water stains or foreign matter on the O-ring and packing, clean it with water and finger scouring. NOTICE: Be sure to perform this procedure by hand, taking care not to damage the O-ring and packing. (2) Confirm that resin or rubber parts are not deformed, cracked or damaged. (3) Check that the O-ring is not swollen. |
|
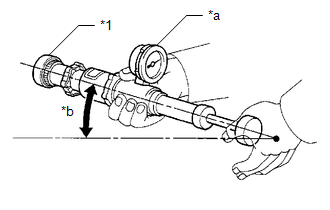
| (b) Check inverter reserve tank cap function (1) Wet the O-ring and packing with coolant. (2) Install the reserve tank cap to the radiator cap tester. Pump the cap tester several times, and measure the maximum pressure. Specified Condition:
NOTICE: Check with the radiator cap tester tilted 30° or more. HINT: If the maximum pressure is below the minimum standard value, replace the inverter reserve tank cap. |
|
READ NEXT:
 Replacement
REPLACEMENT PROCEDURE 1. REMOVE NO. 1 ENGINE UNDER COVER Click here 2. DRAIN COOLANT (for Inverter Coolant) NOTICE: Collect the drained coolant and measure its volume to establish a benchmark. Whe
Frame Wire
ComponentsCOMPONENTS ILLUSTRATION *1 AIR CLEANER CAP SUB-ASSEMBLY *2 AIR CLEANER CASE SUB-ASSEMBLY *3 AIR CLEANER FILTER ELEMENT SUB-ASSEMBLY *4 CONNECTOR COVER ASSEMBLY *5
SEE MORE:
Freeze Frame Data
FREEZE FRAME DATA DESCRIPTION (a) When a pre-collision system DTC is stored, the forward recognition camera stores the current vehicle (ECU or sensor) state as Freeze Frame Data. CHECK FREEZE FRAME DATA (a) Connect the Techstream to the DLC3. (b) Turn the power switch on (IG). (c) Turn the Techstrea
Back Door Motor Circuit (B2220)
DESCRIPTION This DTC is output when the multiplex network door ECU detects a malfunction in the motor built into the power back door unit assembly set LH or RH. DTC No. Detection Item DTC Detection Condition Trouble Area B2220 Back Door Motor Circuit Motor malfunction detected in po
