Lexus NX: Removal
REMOVAL
PROCEDURE
1. REMOVE NO. 1 SPEAKER OPENING COVER ASSEMBLY
Click here .gif)
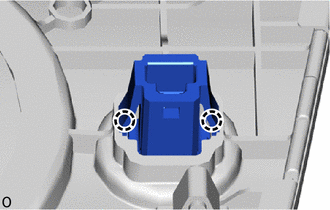
2. REMOVE AUTOMATIC LIGHT CONTROL SENSOR
| (a) Detach the 2 claws and remove the automatic light control sensor. |
|
READ NEXT:
 Inspection
INSPECTION PROCEDURE 1. INSPECT AUTOMATIC LIGHT CONTROL SENSOR (a) Disconnect the automatic light control sensor connector. *a Front view of wire harness connector (to Automatic Ligh
Installation
INSTALLATION PROCEDURE 1. INSTALL AUTOMATIC LIGHT CONTROL SENSOR (a) Attach the 2 claws to install the automatic light control sensor. 2. INSTALL NO. 1 SPEAKER OPENING COVER ASSEMBLY Click here 3.
SEE MORE:
Hazard Warning Switch
InspectionINSPECTION PROCEDURE 1. INSPECT AIR CONDITIONING CONTROL ASSEMBLY (HAZARD WARNING SWITCH) (a) Remove the air conditioning control assembly. Click here (b) Inspect the hazard warning switch. (1) Measure the resistance according to the value(s) in the table below. Standard Resistance:
Installation
INSTALLATION PROCEDURE 1. INSTALL COOLER CONDENSER ASSEMBLY (a) Attach the 2 guides to install the cooler condenser assembly. NOTICE: Do not damage the cooler condenser assembly or radiator assembly when installing the cooler condenser assembly. HINT: If the cooler condenser assembly is replaced
© 2016-2026 Copyright www.lexunx.com
