Lexus NX: Removal
REMOVAL
CAUTION / NOTICE / HINT
HINT:
- Use the same procedure for the RH and LH sides.
- The procedure described below is for the LH side.
PROCEDURE
1. REMOVE FRONT BUMPER ASSEMBLY
Click here .gif)
2. REMOVE FOG LIGHT ASSEMBLY LH
(a) Detach each hose clamp.
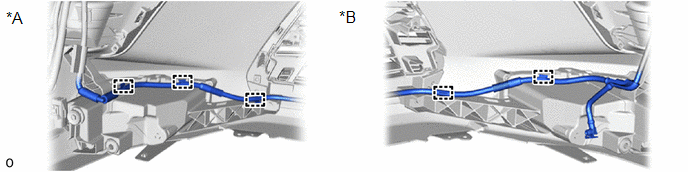
| *A | for LH Side | *B | for RH Side |
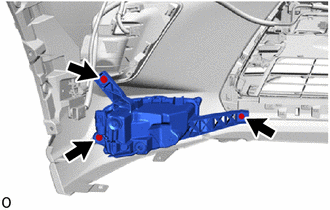
| (b) Remove the 3 screws and fog light assembly LH. |
|
READ NEXT:
 Disassembly
DISASSEMBLY PROCEDURE 1. PRECAUTION NOTICE:
Be sure to read Precaution thoroughly before servicing.
Click here
Handle components indoors as much as possible to prevent foreign matter from enter
Inspection
INSPECTION PROCEDURE 1. INSPECT FOG LIGHT ASSEMBLY LH (a) Apply battery voltage to the connector and check the light illumination condition. OK: Battery Connection Specified Condition Pos
Adjustment
ADJUSTMENT CAUTION / NOTICE / HINT HINT:
Use the same procedure for the RH and LH sides.
The procedure listed below is for the LH side.
PROCEDURE 1. PREPARE VEHICLE FOR FOG LIGHT AIM ADJUSTMEN
SEE MORE:
Inspection
INSPECTION PROCEDURE 1. INSPECT CLEARANCE LIGHT ASSEMBLY LH (a) Apply battery voltage to the connector and check the light illumination condition. OK: Condition Specified Condition Battery positive (+) → 3 (DRL) Battery negative (-) → 2 (E) LED illuminates Battery positive (+)
Adjustment
ADJUSTMENT CAUTION / NOTICE / HINT CAUTION: Radiofrequency radiation exposure information:
This equipment complies with FCC radiation exposure limits set forth for an uncontrolled environment.
This equipment should be kept with minimum distance of 20 cm (7.87 in.) between the radiator (antenna)
© 2016-2026 Copyright www.lexunx.com
