Lexus NX: Removal
REMOVAL
PROCEDURE
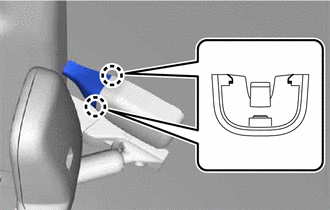
1. REMOVE RAIN SENSOR COVER
| (a) Detach the 2 claws and remove the rain sensor cover. |
|
2. REMOVE RAIN SENSOR
| (a) Disconnect the connector. |
|

| (b) Release the stopper by pulling it down. |
|
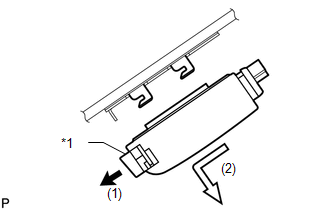
(c) Remove the rain sensor as shown in the illustration.
3. CLEAN WINDSHIELD GLASS
HINT:
- The rain sensor tape is reusable. Only replace the tape if it is damaged or contaminated with foreign matter.
- Check that there is no rain sensor tape residue remaining on the windshield glass. If there is, remove the residue before installing the rain sensor.
- If there is any rain sensor tape residue remaining on the windshield glass, replace the tape.
READ NEXT:
 Inspection
INSPECTION PROCEDURE 1. INSPECT MAP LIGHT ASSEMBLY (RAIN SENSOR CIRCUIT) (a) Remove the map light assembly. Click here (b) Measure the resistance according to the value(s) in the table below. Sta
Installation
INSTALLATION PROCEDURE 1. INSTALL RAIN SENSOR TAPE NOTICE: The rain sensor tape is reusable. Only replace the tape if it is damaged or contaminated. (a) Clean the rain sensor sensing portion with a pi
SEE MORE:
Problem Symptoms Table
PROBLEM SYMPTOMS TABLE HINT:
Use the table below to help determine the cause of problem symptoms. If multiple suspected areas are listed, the potential causes of the symptoms are listed in order of probability in the "Suspected Area" column of the table. Check each symptom by checking the suspect
Inspection
INSPECTION PROCEDURE 1. INSPECT FRONT LUMBAR POWER SEAT SWITCH (a) Measure the resistance according to the value(s) in the table below. Standard Resistance: Tester Connection Switch Condition Specified Condition 3 (H) - 5 (B) Hold switch on Below 1 Ω 1 (R) - 2 (E) 2 (E) -
© 2016-2026 Copyright www.lexunx.com
