Lexus NX: Removal
REMOVAL
PROCEDURE
1. REMOVE SYMBOL EMBLEM
HINT:
When removing the symbol emblem, heat the back door outside garnish sub-assembly and symbol emblem using a heat light.
Standard:
| Item | Temperature |
|---|---|
| Back Door Outside Garnish Sub-assembly | 40 to 60°C (104 to 140°F) |
| Symbol Emblem | 20 to 30°C (68 to 86°F) |
NOTICE:
Do not heat the back door outside garnish sub-assembly or symbol emblem excessively.
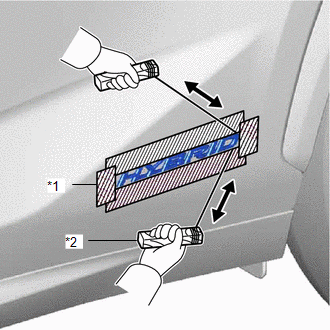
| (a) Put protective tape around the symbol emblem. |
|
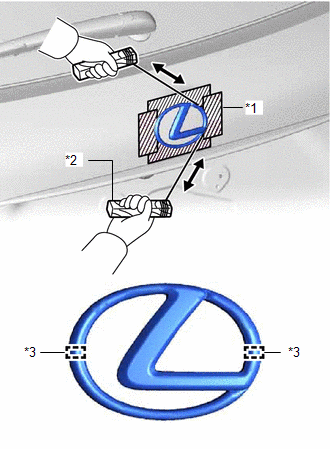
(b) Insert piano wire between the back door outside garnish sub-assembly and symbol emblem.
HINT:
Be careful of the boss positions.
(c) Tie objects that can serve as handles (for example, wooden blocks) to the piano wire ends.
(d) Pull the piano wire and scrape off the double-sided tape that holds the symbol emblem to the back door outside garnish sub-assembly.
NOTICE:
Be careful not to damage the back door outside garnish sub-assembly.
(e) Remove the symbol emblem.
2. REMOVE BACK DOOR NAME PLATE (for Sport Package)
HINT:
When removing the back door name plate, heat the back door panel and back door name plate using a heat light.
Standard:
| Item | Temperature |
|---|---|
| Back Door Panel | 40 to 60°C (104 to 140°F) |
| Back Door Name Plate | 20 to 30°C (68 to 86°F) |
NOTICE:
Do not heat the back door panel or back door name plate excessively.
(a) Put protective tape around the back door name plate.
| *a | Wooden Block |
.png) | Protective Tape |
(b) Insert piano wire between the back door panel and back door name plate.
(c) Tie objects that can serve as handles (for example, wooden blocks) to the piano wire ends.
(d) Pull the piano wire and scrape off the double-sided tape that holds the back door name plate to the back door panel.
NOTICE:
Be careful not to damage the back door panel.
(e) Remove the back door name plate.
3. REMOVE BACK DOOR NO. 2 NAME PLATE
HINT:
When removing the back door No. 2 name plate, heat the back door panel and back door No.2 name plate using a heat light.
Standard:
| Item | Temperature |
|---|---|
| Back Door Panel | 40 to 60°C (104 to 140°F) |
| Back Door No. 2 Name Plate | 20 to 30°C (68 to 86°F) |
NOTICE:
Do not heat the back door panel or back door No. 2 name plate excessively.
| (a) Put protective tape around the back door No. 2 name plate. |
|
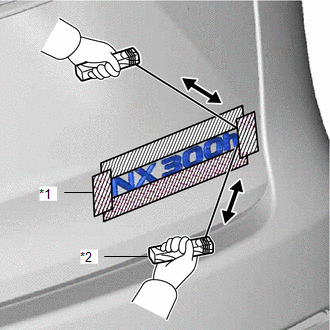
(b) Insert piano wire between the back door panel and back door No. 2 name plate.
(c) Tie objects that can serve as handles (for example, wooden blocks) to the piano wire ends.
(d) Pull the piano wire and scrape off the double-sided tape that holds the back door No. 2 name plate to the back door panel.
NOTICE:
Be careful not to damage the back door panel.
(e) Remove the back door No. 2 name plate.
4. REMOVE FRONT FENDER NO. 1 NAME PLATE (for Sport Package)
HINT:
When removing the front fender No. 1 name plate, heat the vehicle body and front fender No.1 name plate using a heat light.
Standard:
| Item | Temperature |
|---|---|
| Vehicle Body | 40 to 60°C (104 to 140°F) |
| Front Fender No. 1 Name Plate | 20 to 30°C (68 to 86°F) |
NOTICE:
Do not heat the vehicle body or front fender No. 1 name plate excessively.
(a) Put protective tape around the front fender No. 1 name plate.
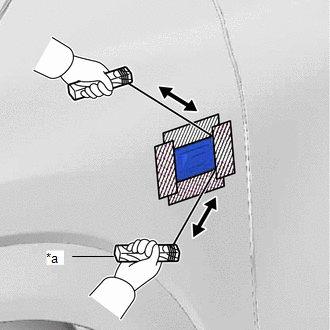
| *a | Wooden Block |
| | Protective Tape |
(b) Insert piano wire between the vehicle body and front fender No. 1 name plate.
(c) Tie objects that can serve as handles (for example, wooden blocks) to the piano wire ends.
(d) Pull the piano wire and scrape off the double-sided tape that holds the front fender No. 1 name plate to the vehicle body.
NOTICE:
Be careful not to damage the vehicle body.
(e) Remove the front fender No. 1 name plate.
5. REMOVE REAR BODY NO. 4 NAME PLATE
HINT:
When removing the rear body No. 4 name plate, heat the rear door panel and rear body No. 4 name plate using a heat light.
Standard:
| Item | Temperature |
|---|---|
| Rear Door Panel | 40 to 60°C (104 to 140°F) |
| Rear Body No. 4 Name Plate | 20 to 30°C (68 to 86°F) |
NOTICE:
Do not heat the rear door panel or rear body No. 4 name plate excessively.
| (a) Put protective tape around the rear body No. 4 name plate. |
|
(b) Insert piano wire between the rear door panel and rear body No. 4 name plate.
(c) Tie objects that can serve as handles (for example, wooden blocks) to the piano wire ends.
(d) Pull the piano wire and scrape off the double-sided tape that holds the rear body No. 4 name plate to the rear door panel.
NOTICE:
Be careful not to damage the rear door panel.
(e) Remove the rear body No. 4 name plate.
READ NEXT:
 Components
COMPONENTS ILLUSTRATION *1 CLEARANCE LIGHT ASSEMBLY LH *2 CLEARANCE LIGHT ASSEMBLY RH *3 HOOD TO FRONT END PANEL SEAL *4 NO. 3 ENGINE ROOM WIRE *5 RADIATOR GRILLE SUB-ASSEMBL
Removal
REMOVAL PROCEDURE 1. REMOVE FRONT BUMPER ASSEMBLY Click here 2. REMOVE NO. 3 ENGINE ROOM WIRE Click here 3. REMOVE CLEARANCE LIGHT ASSEMBLY LH (a) for LED Type Side Turn Signal Light: Click here
SEE MORE:
Disposal
DISPOSAL CAUTION / NOTICE / HINT HINT: The tire pressure warning valve and transmitter is powered by a lithium battery. When disposing of the tire pressure warning valve and transmitter, remove the battery and dispose of it properly. PROCEDURE 1. DISPOSE OF TIRE PRESSURE WARNING VALVE AND TRANSMITTE
Removal
REMOVAL CAUTION / NOTICE / HINT HINT:
Use the same procedure for the RH and LH sides.
The procedure listed below is for the LH side.
PROCEDURE 1. REMOVE NO. 3 DECK BOARD SUB-ASSEMBLY Click here 2. REMOVE REAR DECK FLOOR BOX Click here 3. REMOVE DECK FLOOR BOX LH Click here 4. PRECAUTIO
